
I finished my yardstick Christmas tree last weekend! I have no idea how many cuts I made or holes I drilled, but I’m sure it took over 12 hours to make. While this is not a tutorial I’ll cover the basic steps in case someone wants to take this on for their own home. I thought of this idea last year and started bidding on yardstick lots from eBay. I collected from 80-100 yardsticks and was able to use most of them. Of course, that was last summer and I had planned on building this in October.
Last week I started by marking the angle of the tree and figuring out the most efficient use of the sticks. Then I used a chop saw to cut all of the lengths. I didn’t even try to keep them in order of length. I recommend drilling the holes with a Forstner bit set up with a jig on a drill press. I tried a regular bit, but the yard stick is too thin and rattled around until the hole was a chewed up mess.
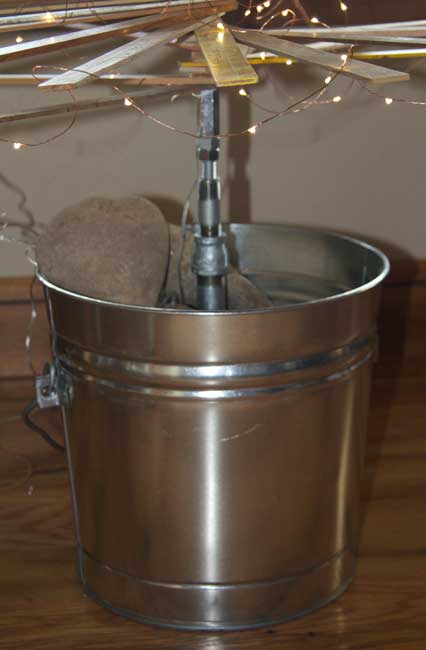 Next year I’m going to modify the base, however the basic idea worked out this year. I made a few last-minute modifications, which is why there are so many parts. Basically I bolted a galvanized steel pipe to a bucket and then filled it with rocks for stability. I can toss out the rocks after the holidays and store the light weight bucket. This almost worked, but the tree tilts easily and I need more support to keep the center rod straight. I have some ideas…
 I then organized all the cut yardsticks by length (took longer than expected) and stacked them on a 6 foot piece of 1/2″ all-thread. The advantage of all-thread is the ability to use bolts to make the stack of yardsticks tight on the pole. I then connected to another 18″ piece that slid into the galvanized pipe in the bucket. That means the tree is 7″-6″ tall and about 36″ wide at the base. If I can find a longer piece of all-thread next year, I may add another foot or so at the base to make it even taller and wider!
 I was planning on taking my cordless Dremel and drilling holes for ornaments, but the tree is already interesting enough as is. I found these cool little lights on Amazon and that seems like enough! The whole thing folds flat and is light enough for me to carry it to the basement for storage. I’m going to take a week or so off of posting so I’ll be back the first week of January. Happy Holidays to all!!


HOW cool is this Wendy!?!? you are awesome! Happy NY. XOXODIane
I’m taking it down today, and I think I’ll miss it! Hugs and a happy new year to you.
This is so cool. Happy New Year!
Thanks!
How cool is that?! A brilliant idea, and it’s so pretty with the tiny lights on it. Great job.
Happy holidays to you and yours!
So cool!!!
What a fun tree! Equally appropriate for woodworker and sewist.
So fun! Great idea, execution and tutorial. Do you know how many of these you are going to inspire? Zillions!
It would be easy to make a smaller version, so maybe others will make them. That would be wonderful!
Most excellent! Thanks for the mini tute, I just may have to do this for next year. Happy holidays and a merry new year! Ani
It took a bit of planning, but it was worth it.
Loved the tree! Loved the wine! Loved the company the most! Merry Christmas Wendy!
WHOOPEEEEEEEEEEEEEEEEE
Hope your holidays are fun and sober! speak for myself….now I know whzt “feet to the fire” means, what a meditation attidute!Really loved the tree from yesteryear but this one is an art work! prize work! Love and thanx for my life!
There’s a Quitman yardstick in there from your garage!
Wendy:: You did just a splendid job on your tree. What a festive sight to gaze upon during our dark nights ahead. Impressive!!
Thanks. Hope to get together in 2015!