So much for New Year’s Resolutions

I promised myself that I would blog twice a month, and this is my first blog of 2017! Oh well, I’ve been sewing so I need to catch up. As a blogging warm up this will be short, but at least I’m here typing away. img_0158

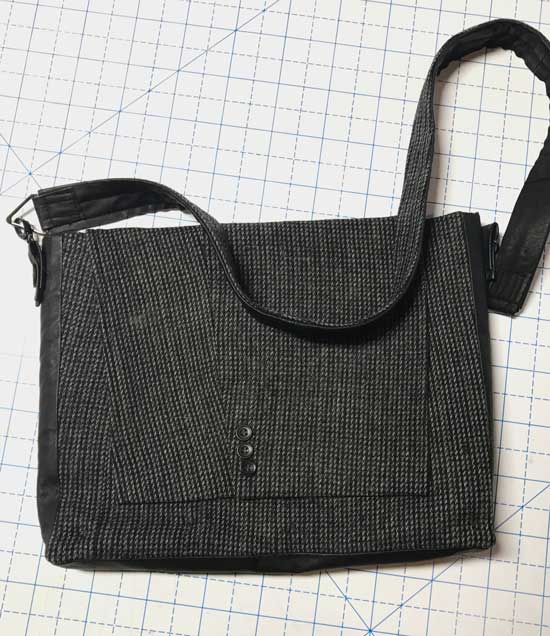
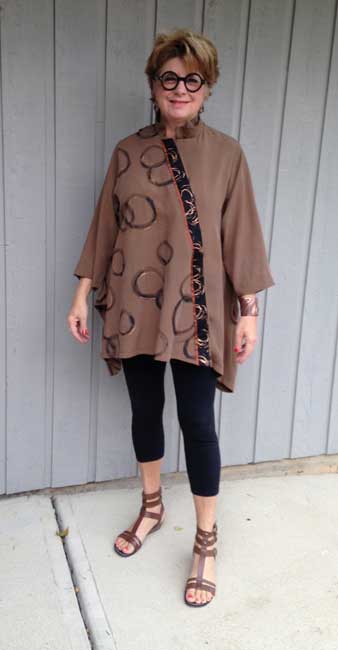
For Christmas I made this messenger bag for my husband. When we are on trips he has always handed me his iPad to carry. My purse became so heavy sometimes he had to carry it!img_0160

I thought it would be fun to take an old mens jacket to make him a bag. My BSF not only had an old sport coat, she had a black leather skirt and  only needed half the material. I made a box out of very heavy stabilizer (1/8″ thick) so the iPad can sit up and not be damaged when placed under a seat. The best part is now he carries my iPad in addition to his, so my load is much lighter! He uses the pocket for the cords.  img_0163

I returned the scraps to my BSF and Debra made two more bags using two pockets on one bag and the sleeve detail for the other.img_0017img_0018

Don’t you think they are fabulous? I think 3 items from one old sport coat is pretty great. My husband is never giving away an old jacket again!img_0016

Vest Refashion and my BSF

Ever buy something that doesn’t fit, but you keep it anyway? Well that is this vest. I like that it was long, but it’s too long. I love the belted waist, but it unfortunately doesn’t fit my waist! The neck is so small that it doesn’t comfortably fit anyone. At least I liked the fabric and the pockets. So there it hung, alone in my closet, waiting for some 6 foot tall, thin woman with an impossibly skinny neck.Black-Vest-Before

This is what I did:

First I cut off about 10” of length. Then I ripped out the side seams and finished them leaving an open seam under the arm. Shaping the neck into a V solved the neck fitting problem. Then I took the extra hem fabric and made a side panel to highlight the waistband that buckles in the front. At that point it looked pretty good, but I decided that the completely open side made it difficult to find something to wear underneath. My BSF Debra agreed with me.Black-Vest-refashion_3

Time to go shopping in my stash store! Debra and I found this cool laser cut neoprene fabric and that solved the side panel issue and provided a nice contemporary lace edge for the neck. It’s so nice to have a second sewing friend to bounce ideas around. Thanks Debra.

Black-Vest-refashion_1

Black-Vest-refashion_4

Speaking of my BSF, here she is finally appearing on my blog! Debra is modeling her fabulous hand painted shirt. It’s the Lynn Mizono Vogue pattern 1274 that we started together on one of our sewing days. Don’t you love the hand painted black trim? Snap tape hidden under the decorated edge secures the top. Those shoes, copper bracelet and cool glasses…you got it going on girl!Debra-Lynn-Mizono-shirt-web

Refashion Geisha Tunic

Geisha-Shirt3I had loved an old tee-shirt with a geisha asian theme, but alas it not longer fit. I put it in my refashion stash waiting for the right inspiration. A few weeks ago my husband asked if I wanted an old polo of his.  When it turned out a very similar stripe to the background of my geisha tee, I started stash shopping for one more coordinate knit. Vogue 8962 is the perfect pattern since the front panel is narrow and fit my old tee to perfection.

The back pattern pieces are fairly large since the side seem shifts toward the front. The polo shirt stripe and the knit stripe coordinate pieced into a new textile. Then I cut out the back pieces with this new patchwork fabric.Geisha-Shirt

I think the deconstructed net sleeves look great with this tunic. I do have to put my arms through with my hands in a fist so my fingers don’t catch the holes!Geisha-Shirt_1

Testing out some fabric ideas on the neck turned into a solution. I just sewed the strips around the neck and left them twisted and raw. A little hand tacking keeps the neck in place. It’s  great to have my old tee back in a new form!

Silk Charmeuse Shirt Refashion

Silk-Charmeuse-Refashion-FSwebI have seen a number of wonderful refashion projects using shirts to make skirts. I owned a few silk charmeuse shirts that I never wear and then found another at a used clothing store. My fabulous mother-in-law gifted me the black one on the right.Shirts-before-cutting-SI-web First I washed and dried the shirts with the cotton setting on my washer. Yes, hot water and a hot drier! Silk is very strong and I wanted this outfit to be washable for everyday wear. The first photo is of the shirts after washing. Hardly any wrinkles, and if they did shrink then better now than after sewing.

I started by cutting off all of the elements and sorting. The collars in one area, sleeves, cuffs, and the main body parts are each placed in their own pile. The leopard shirt caught my eye and I decided to save the body of that shirt to make into a sleeveless shirt/vest. This photo shows the shirts placed to form bottom of the skirt.Shirts-in-progress-SIweb It’s fun to include some of the plackets with buttons. I decided to use the Taos Skirt pattern from Diane Ericson. It has a simple front and back and multiple ways to make the waistband so I could postpone that decision until later. In the end I decided (with the help of my BSF Debra) to make the waist out of the cuffs from the shirts.Skirt-Back-SBweb The shirt was simple with binding from one of the shirts and a doubled collar from another shirt. I think it will feel great when the warm weather finally hits!Silk-Charmeuse-Shirt-refashion-SOweb

Not just another sweatshirt

Lauren-Sweatshirt-FMwI wear my first sweatshirt refashion so much I decided to tackle another. I started with a very small Ralph Lauren sweatshirt with an awesome military collar. I took the back off again and added it to the front. This time there wasn’t enough fabric in the original sweatshirt to allow for princess seams, but I cut the sweatshirt in a triangle with the smallest part aligning with the collar shape. I think it still has a slimming line on top.

Lauren-Sweatshirt-OMwWhen I tried it on it was still too small on top. Aha, a GDO! (good design opportunity). I took the fabric from the sleeves and added a triangular gusset under the arms. I like the detail it adds to the garment.

Lauren-Sweatshirt-DBwA triangle in the back finishes the line and concept. Overall this tunic is slimmer than the last one and I may even like it better!

Mind the Gap Sweatshirt Tunic

I love the feeling of a sweatshirt, but the boxy shape is so unflattering on me.  Anything that hangs straight down from the “top shelf” ends up too big at my waist. This orange Gap sweatshirt caught my eye at the local thrift store because of the color. The contrasting color is purchased fabric.Gap-Sweatshirt2-FMwSince I don’t know how to draft a pattern from scratch, I used 3 different patterns to come up with the basic lines of the tunic including the princess seam on the front. Basically there is just a touch from each pattern and then I went to work fitting on my dress form.Gap-Sweatshirt-OMw

I cut the back of the original sweatshirt a few inches down from the neck leaving a back yoke. This piece is then added to the front to give the tunic a long line of orange. I also cut off all of the banding from the sleeves and hem to reuse as the band for the final silhouette.

Gap-Sweatshirt-BMw

The back seemed too large around the waist so I made some little pleats.

Gap-Sweatshirt-DSw

Since black skinny knit pants have become my go to bottom, I stenciled the front kangaroo pocket with a few numbers in black.

It’s so comfy, but just a little bit dressier than your average sweatshirt!

2T Vest #1

I had to name this vest #1 since I love it so much I have already made a second one. I’ll photograph that one and put it on a later post. The idea started with a vest on Diane Ericson’s blog.  My BSF (Best Sewing Friend) Debra and I started with a trip to Goodwill. Goodwill HaulWe met there and spent a half hour picking out men’s and women’s knit tops that color coordinated. Her stash was black, grey and blue. Size doesn’t matter, in fact the larger the top the more fabric you get. I spent about $24 and will be able to make at least 3 tops from this pile.

The next day we met and started to chop and sew. This vest is made from the two tops from the lower right. 2T Vest #1We tried them on before sewing any side seams and made adjustments like darts if needed. The whole idea for this garment is to wear it over a turtleneck, so the fit is easy. The original collar is from the man’s shirt so you get a zippered neck without any effort! The black pockets and back detail consist of some black knit from my stash embellished with scraps from the women’s shirt. A little hand stitching and a sewn on “necklace” finished it off. Women’s clothes so rarely have usable pockets making this an awesome practical top for everyday wear.2T Vest #1 Details2T Vest Back Neck