I’ve been so excited about my two luscious pieces of silk/rayon velvet that I purchased in Paris. By the way, I washed and dried both pieces as soon as I got home, and they came out of the dryer in perfect condition. Now the search for what to do with them…
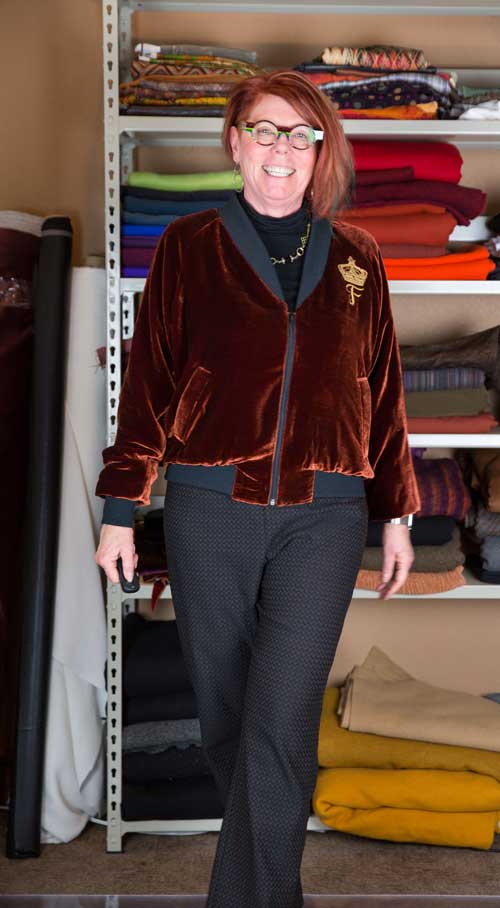
After looking around Pinterest and with memories of a beloved rust bomber jacket from years ago I decided that the rust colored velvet should become a Rigel Bomber from Papercut Patterns in New Zealand. While waiting for the pattern to arrive (It took almost 3 weeks!), I decided to try a bit of snow dying to have a few coordinates for the velvet.
I’ve done most types of dying, but something about scooping up a bunch of snow outside my studio door and dumping it on my fabric was a novel approach. The basic process involves first soaking the fabric in soda ash diluted with water. The second step is folding or scrunching your fabric in a flat plastic container and dumping a bucket of snow (or ice) on top. The third step is to simply scatter dry fiber reactive dye on top and let the whole thing melt and process for 24 hours. There are plenty of detailed instructions on the Internet if you want to know more, but this was the easiest dying ever!

Here are the results with my two pieces of Paris velvet. I loved the simplicity of the process including the surprise results the next day. I processed one piece of PFD (prepared for dying) white Kaufman Radiance fabric, and one piece of PFD rayon/silk velvet from Dharma Trading each in their own tubs. Now I have a hip lining and a coordinating piece of velvet that I hope to use with the purple velvet.


One thing about the Rigel Bomber is the lack of a lining. Almost all of the sewists out there are drafting their own lining pattern, and that is what I did. I also cut the interfacing out of the velvet, but had nothing but problems with it. Velvet is a VERY difficult fabric to sew with and with the zipper I just couldn’t get it to work out for me. Instead I recut the interfacing pieces out of the lining fabric. I could have made this one piece, but unfortunately by this point I didn’t have enough fabric to cut a second one-piece lining.
For all the velvet seams I used ¼” Lite Steam-A-Seam to keep the fabric from slipping while I sewed the jacket parts together. It worked like a charm and I would recommend the extra step to save one’s sanity while sewing velvet. The cuffs, collar, and waist ribbing all came from The Rain Shed. There is a website, but you still need to call them, and they are super helpful on the phone. The cuffs are ready made so have no seams and they even have colors, but I still decided to go with black.
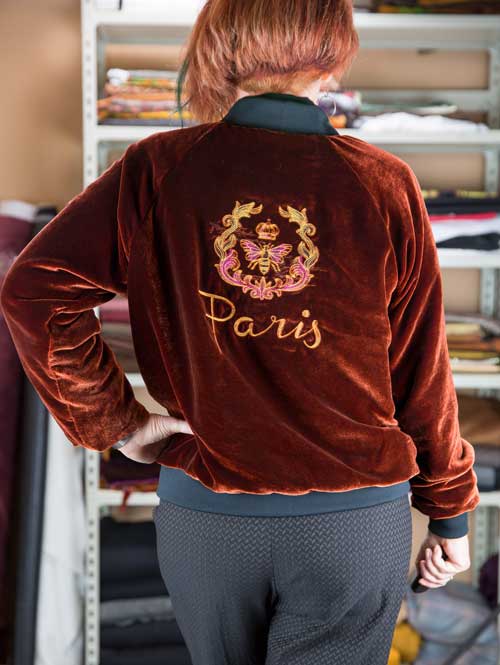
The runways have shown plenty of embroidered bombers for a season or two and I thought it would be fun to do a bit of embroidery with my new machine. I purchased the Parisian themed designs from Urban Threads. While I’m developing my skills at designing my own embroidery, I think this set is perfect for this project. I tried the back embroidery once and wasn’t happy with the outcome, but luckily we had a Husqvarna Viking sewing expert, Alix Graham-Michel, give a class last week and my second embroidery came out perfect. Thanks Alix!

Au Revoir!


Love the pants / jacket combo. Lots of great ideas here.
Oh, I love Urban Threads! But I don’t have an embroidery machine so I look at their hand embroidery patterns. Your jacket is wonderful (I have that pattern in my stash, too) and that lining is fabulous!!
Glad you mentioned that. I love hand embroidery, but it takes away from my knitting time. Too many interests!
What a wonderful jacket, from style to fabric to embroidery to dyed lining! I had no idea you could do such sophisticated things with home machine embroidery. Everything I have seen has been either cutesy or retro. Love the dying technique, but it won’t be happening here on the central coast of CA!
There are some wonderful sophisticated embroidery designs out there, but hardly anyone uses them. You can dye with a bag of crushed ice from the store. I was born and raised in California, and I still miss the weather!
This fabulous!! I love it😍
Thanks Ruth. I’ve been meaning to email you about your especially fabulous Koos jacket!
I’m gobsmacked! What an incredibly wonderful project. Wendy, you’ve outdone yourself. It’s just so beautiful in every way. And this post was a great read! Thank you!
Gobsmacked! I love that.
Beautiful fabric shown off to great effect! Urban Threads do some great embroidery designs.
I want to start designing my own embroidery, but in the meantime I do love Urban Threads.
Can’t wait to see your own designs!