Summer Clothes are Here!

Katherine-top_4

My BSF Debra has been pushing me (I needed the push) to start on summer clothes. There are several patterns we have wanted to try, so we pulled them out and chose Butterick 5891 by the uber talented Katherine Tilton.

Side Note: My BSF and I are going on a tour of Paris in the fall with Katherine and Marcy Tilton! We’re so excited!!!!

Both of us agree that this is NOT an easy pattern (as stated on the pattern envelope). A typical shirt would have from 4 to 8 pattern pieces and this pattern has 15! Then there are some funky folds and an unusual collar finish. Top that off with 3 different fabrics and this baby took several days to finish.Katherine-top_3

It seemed early in the season to make a sleeveless shirt, but I solved that by making the arm opening a little larger so I could wear this as a vest or shirt.

I made a muslin and added a dart for my very first time! The dart came out fine, but will be better next time. I need to perfect this skill so woven tops fit correctly. The size I choose was to big on me (despite the muslin). This pattern doesn’t have full length side seams to adjust fit, but it does now! Not an afternoon project, but it did come out pretty cool in the end.Katherine-top_2

I’m very happy with the project, and it will feel great on a super hot day.  Several fellow bloggers have made fabulous versions of the jacket, sometimes as a jacket, vest or shirt. I may have to make that one very soon. Katherine-top_1

TNT 8962

TNT-Brown-stripe_2

One of my favorite TNT (tried and true) patterns is Vogue 8962. I have made it several times before here and here. It’s easy, flattering, fast and just what I needed to end the winter season heading toward spring.  Snow was falling, but I knew that the sun will shine in a few days and it is here today! I grabbed some fabric from my stash and whipped up a new top by afternoon. I’ve worn it several times already.

TNT-Brown-stripeThe interesting thing about this pattern is how the stripes meet in the back forming a “v” shape. I love it! The pattern picture shows a stripe fabric, but never from the back so it was quite a surprise, and in a very good way.TNT-Brown-stripe_3

What’s going on?

I have a few things in progress, however I’m making lots of plans for the next couple of months. This week will be an overview of things to come including WIPs (works-in-progress), new fabrics for spring and a couple of light fixtures I’m making for the house. I’m not sure which project is the most exciting!

Works-in-progress

Projects-022115

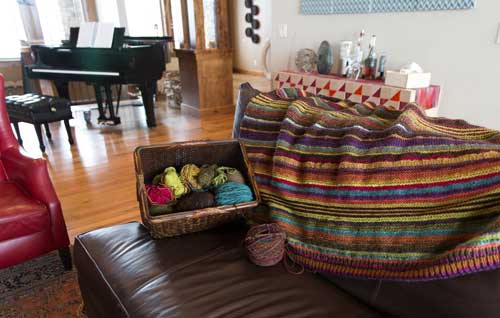
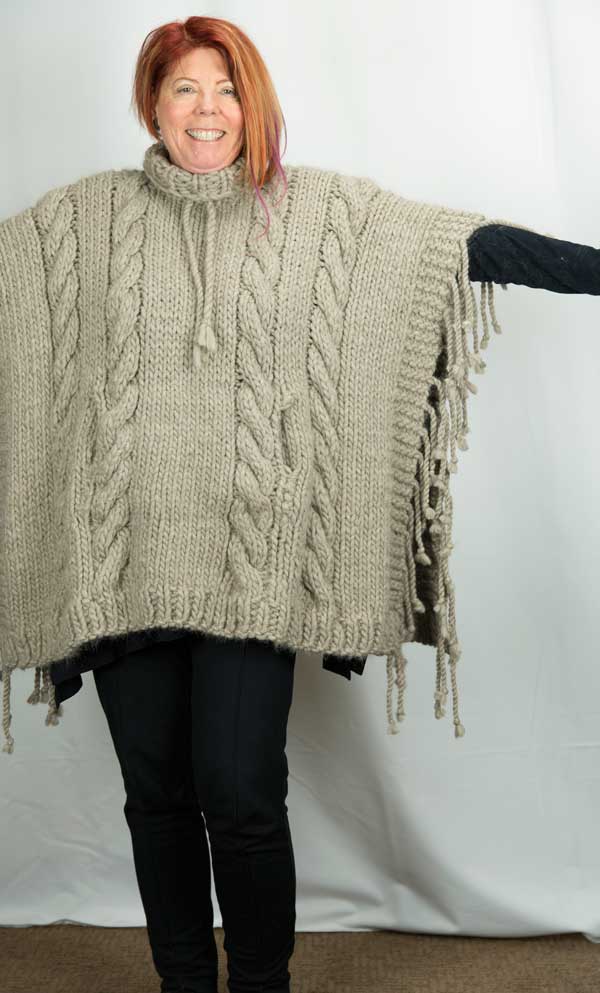
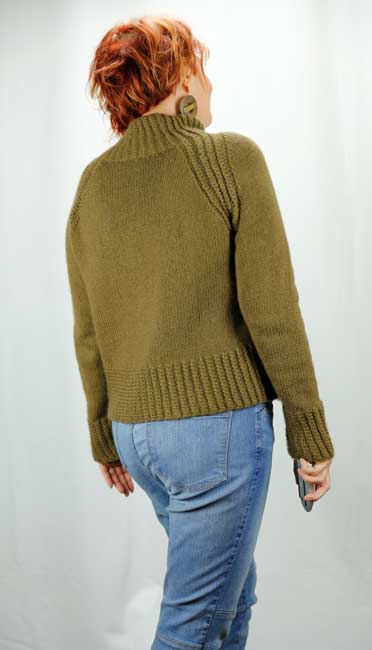
First I have two projects I’m working on. I want a little more color in my living room. At the same time my yarn stash of leftover skeins is getting out of control. Yep, an afghan of many Wendy colors! I picked a basket of colors that coordinate with my living room and the lime green patio furniture outside the windows. I rib knit a couple of inches and from there on I’m knitting in garter stitch with a very occasional few rows in stockinette. When I get tired of a color I just switch to something different. I’m not even giving much thought to the weight of the yarns other than doubling some of them at times. One end will have fringe from all of the loose ends and I will need to do some finish on the other end. I might bind that edge with suede, wool, or crochet an edge. Sometimes it’s just relaxing to just knit without having to worry about shaping or fit!

Projects-022115_2

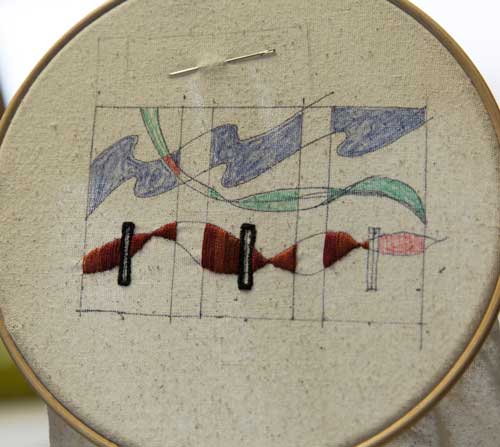
The second work in progress is some embroidery with no plans on where I will use it. I love a little handwork now and then, but when I’m almost finished with a project I can’t get myself to wait for a small labor-intensive detail. I’m making some elements to have on hand to enhance a project when I desire. I may even design something just to use these decorative pieces. Shown here is the beginning of three button-hole tabs for a future jacket or blouse.

Fabrics for Spring

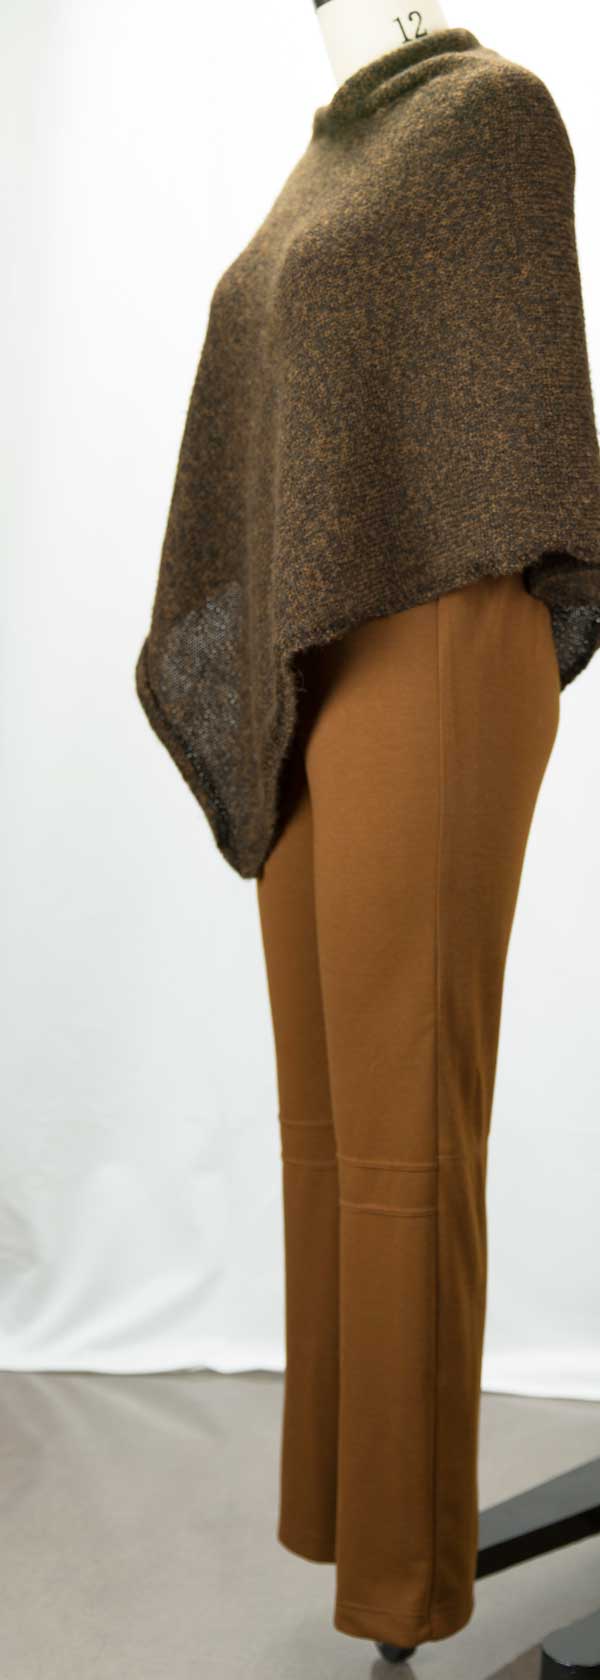
My spring wardrobe sewing plans are coming together. I just drafted a classic straight pant that I hope will work well with some of my knits. Then I can modify the pattern to work with the linen pants that I love to wear in summer. Here are a few fabric combinations that I have grouped together to make outfits.

Projects-022115_4Green knit pants with coordinating floral and solid top options.

Projects-022115_7Thin stripe linen pants with a soft rayon challis for a blouse.

Projects-022115_6Lime green linen pants with a cotton lawn shirt.

Projects-022115_5
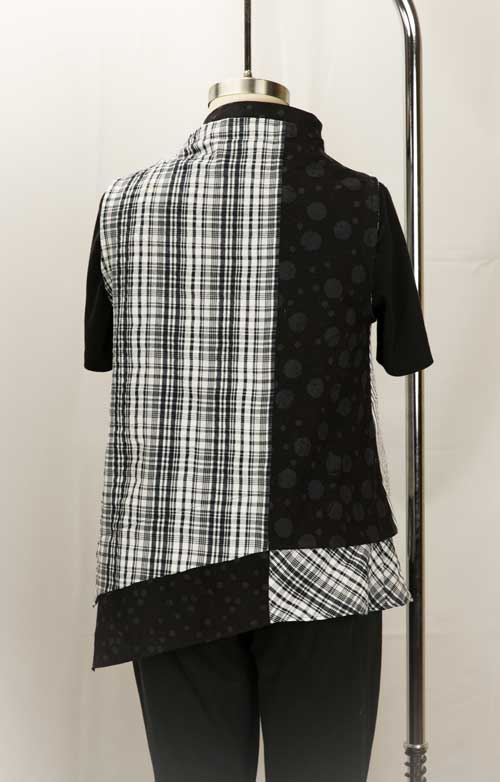
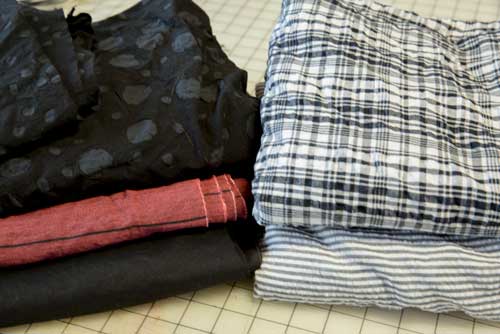
Black linen pants with a red and black cotton and linen blouse and a stripe and plaid seersucker blouse.

I have more rayon challis coming in with some wild prints for a change. I’m normally a fall color person who struggles with spring/summer colors, but I think the upcoming season is looking up on the wardrobe front!

Light Fixtures

Projects-022115_3
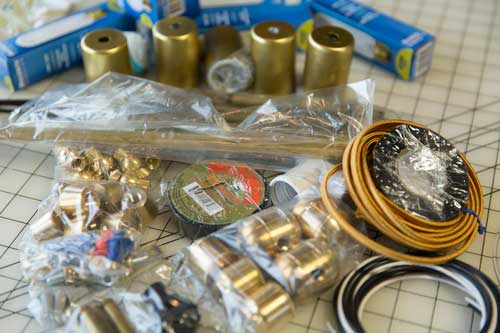
Then I’m making light fixtures. For several years I have admired the work of lighting designer Lindsey Adelman, but couldn’t afford the fixtures.Adelman-ceiling-light

Adelman-desk-light

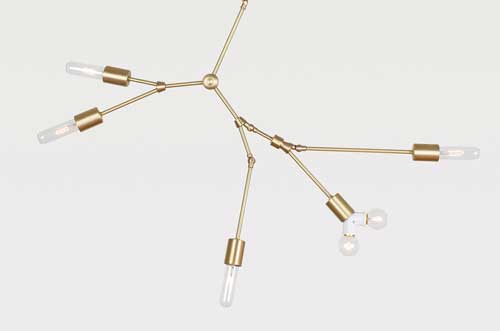
Her fixtures run from around $7,500 to 15,000, but she is now offering directions and supply lists for a cool branch series. The kit for the chandelier is $145!!!! I have parts for the You Make it Chandelier, and two of the You Make it Desk Lamps. So Cool!!!!

Heartfelt Vest

Heartfelt-Vest_16I bought this amazing fabric at Allyn’s Fabrics in Denver. This store has been there forever. To give you some idea, the current owners bought it almost 45 years ago. I’m pretty sure some of the fabric is old and priceless. You have to dig while praying that the bolts at the top touching the ceiling don’t come down on you. In some areas my BSF and I needed to use our cell phones as flashlights. The staff is very friendly and it is a must stop in Denver.

I bought two pattern repeats, and proceeded on the search for the perfect jacket/vest design to show off the green border. Finally, it dawned on me that this fabric speaks for itself. I need a versatile pattern with simple lines, allowing me to make decisions on the fly. Diane Ericson’s Heartfelt Coat to the rescue! This is the same pattern I used on my first ever blog post. That hand-pieced fabric had the same requirements of simplicity with options.

Heartfelt-Vest_4After making the basic shape I spent a day making sleeves and then taking them off and adding a simple band to finish the arm opening. Then I played around with a button/ large snap closure that was too heavy for the (mystery) textile. I removed the button and heavy snaps, and added lighter snaps.

Heartfelt-Vest_1Heartfelt-Vest_5Finally I explored collar options. This multi layered bias collar is also a Diane technique. I love having a good stash and the hand-dyed green organza was sitting on a shelf just waiting for the perfect project.

Heartfelt-Vest_2

The fabric isn’t stable enough for the pockets I hoped for, so I still have a few scraps of fabric and the unused button. I plan on making a little matching purse in the next few weeks. I also have a lovely green knit slated for a pair of pants to coordinate with the vest.

Happy Valentines Day to all!

You did it again Marcy!

Tilton-Slim-Pants_3

I didn’t get much sewing done this week, but I did have one sewing afternoon with my BSF. This is my first pair of sewn pants in years! With all the nice heavy stretch knits available, making a well-fitting elastic waist pant is easy. Or perhaps (definitely) they fit because the designer did a great job with the pattern. I used Marcy Tilton’s close-fitting pants pattern Vogue 8859. Many of my fellow bloggers have made these pants with success and I can see why. While easy to put together they have a few extra details like the knee pleats and a back waist yoke that make these look stylish.Tilton-Slim-Pants_4

The poncho I put on Roxanne is a couple of years old, but an absolute favorite. It’s just a 25” x 50” rectangle sewn together on the long side except for a neck opening. If you don’t have one, get to your needles now! I wear it almost every morning before I warm up for the day, and just decided to put it on Roxy at the last-minute. Looks good with the pants!

The story of the $1300 Poncho

$1300-Poncho_3Snoop shopping is fantastic in Santa Fe, New Mexico. Long gone are the days of coyotes with bandanas! Designer labels and art-to-wear where abundant when my husband and I were there last Thanksgiving. At Santa Fe Dry Goods, I had great fun trying on Issey Miyake jackets. Then I discovered Sophi Hong who uses mud dyed silk for her luscious coats and jackets. I used a few of her little details on my recent black shirt like the stitches on the placket indicating snap locations.

My generous husband bought me a number of fabulous things at some of the other stores (I guess I’m not going on a ready-to-wear fast anytime soon). Then at one store I spotted a big pile of knitting on a lower shelf and pulled it out. It was a soft, squishy, lovely, yummy big armful of yarn that turned out to be a big poncho with a pouch pocket. I was in love, and slipped it on…more in love. Cashmere I asked? No, it was 50% alpaca and 50% merino and it was hand knit AND 1300 dollars! I eyed it up for a minute and folded it back up. I can make that I thought to myself.

$1300-Poncho_6

How often we say that and don’t ever take the project on, but when I got home I started planning. I decided that Blue Sky Bulky Alpaca Naturals was the identical yarn. I bought one skein locally to swatch and plan the pattern. This yarn is a super bulky and I finally went with #17 needles and about 7 stitches for 4”.

$1300-Poncho

After planning and swatching, I ordered 23 skeins just to be safe. It took 20 for the poncho I made, and took about 30 hours of knitting. Those stitches were pretty hard on my hands and I managed to knit about 5” per 2-hour movie.

I tell all of this because it is interesting to note that $1300 is not an inappropriate price. The wholesale price for a $1300 piece of clothing can be calculated to at least half of retail at $650. I received a bulk discount at yarns.com, however the yarn still cost $217.50 (I’m sure a designer can get this yarn for even less). Then I knit for 30 hours. Even at $10.00 an hour that would be $300 and at $20 an hour we are way over the wholesale target. I’m not even including designer showroom and rep costs or shipping.

$1300-Poncho_5

Wow, it’s no wonder hand knits are so expensive. I’m going to go hug my poncho…yummy!

Painted Shoes

Painted-Shoes_2I have been working on multiple projects this week, including these painted shoes. My BSF and another friend, artist Karen Ramsey, came over to my studio to paint fabric, aprons, and shoes. We had a fantastic time with lots of creative energy! The fabric is still a work in progress, but Karen is a wonderful artist and sketched with paint on an apron for me and a piece of fabric for Debra. I also have a piece of fabric in progress, that will show up at a later date.

Last fall I bought a pair of these relatively inexpensive Aerosoles from DSW. They were so comfortable, especially for a shoe with a bit of a wedge heel that I ordered two more pair to paint. That was at least 3 months ago, but with two friends to encourage me, I finally tackled the project.

We pulled out all I have of Jacquard Neopaque and Lumiere and started painting. I’m proud to say we were fearless! Painted-Shoes_4I wanted one pair to work with my favorite browns and oranges without completely eliminating the black (since I often wear black pants). Painted-Shoes_6The other pair I plan to wear with jeans and maybe a red sweater. I often buy red shoes, but they are usually with black without the denim blue accents. I think I will wear the earth tones constantly especially in March when we get to the transitional weather.

Ichi-on-PonchoNext week I’ll show you my $1300 Poncho (of course I didn’t spend that!) as soon as I can get my cat off of it.

Shirt of My Own Design! (almost)

Black-muslin_Front One of my goals for this year is to alter or make my patterns to suit what I really want. Last year I made a cotton shirt from McCalls 6436 that was fairly successful in appearance, but had some fit problems that were mildly annoying when moving or sitting. The body simply didn’t have the flow and ease I desired for a wearable shirt. I’ll be honest, I could just wear knits every day, but there are so many incredible woven textiles in the market that I wanted to solve this problem.

I recently saw a photo of back of the Zelida blouse by Lafayette148 ($398 for a white blouse?!) and fell in love with the flow of the back pleats and yoke. The McCalls blouse didn’t have a yoke, but that seemed easy enough and off I went into alteration mode. This blouse took several weeks to make since in the end I made significant changes to every single pattern piece! I can honestly (and legally) call this my own design.

I added the yoke and pleats to the back and changed the hem profile. It’s now longer in the front and curved in the back. The front and back pieces also required shape modifications resulting from the added pleats and hem.Black-muslin_Back

I changed the collar to a one piece with a different shape so it could sit up at the neck.Black muslin_Neck embroidery

I changed all of the darts to better fit my body and reduced the shoulder width for fit.

I removed the traditional front placket and designed an interfacing instead so I could inset a trim detail. The red boxes are the stitches to hold the snaps.Black muslin_Detail

I removed the cuff and redesigned the sleeve hem.Black-muslin_5

I added besom pockets to the front to hold my phone and glasses.Black-muslin_Pocket

It should have just been a muslin with all of these changes. However the lovely stretch cotton fabric was very forgivable and the shirt began to shape up. Since it was wearable I decided to experiment with some added details like the grosgrain ribbon trim and a small appliqué embroidery element on the collar.

Black muslin_Neck embroideryI can think of several changes that would be fun additions, but for now I think I have a new TNT!

Sunsets and the Lake Placid Sweater

My first blog of the New Year! It took me a number of days into this year to start writing, but not because I haven’t been creating. I received a new camera for Christmas and it took me quite a few days to get used to the new features. The High Dynamic Range shooting feature is fantastic! It takes three photos at different settings and combines it into one photo with near perfect settings. Here is an example taken from the backyard looking toward the Rocky Mountains.web- It was a spectacular sunset, but my eyes saw purple, pink and orange in the sky and reflective snow in the foreground. Just like this:Backyard-0115

I use photography for documentation rather than as an art form, however I will be taking a class at Anderson Ranch this summer, so I hope to get a little more involved with my camera.

I did finish my Lake Placid sweater I showed in progress in December. Yes, I did name the sweater after the movie with the mega-gigantic alligator. The actual name of the pattern is Flet which was designed for the new yarn Woolfolk Far.Lake-Placid-1 It’s a chainette type yarn so I was hoping that the pilling would be less, however those little balls are unfortunately showing up everywhere. Despite that issue this is very soft yummy yarn that feels almost like cashmere (its high quality merino) and is a beautiful color. I think the chained rib details add a beautiful touch to fairly simple raglan pullover pattern. Lake Placid Sweater DetailIf I made this again it would be about 2” longer, and maybe an inch shorter in the sleeves. While I have become better at picking knitting patterns that fit, I think it’s time to start comparing measurements of sweaters I love and altering the new patterns before I knit them.Lake-Placid-Sweater-2My next knit is a poncho made from a super bulky yarn. I couldn’t resist trying on a very expensive hand knit poncho ($1300!!) in Santa Fe over Thanksgiving. WOW, it was sumptuous! I couldn’t get it out of my mind, so I’m recreating my version from memory and I can’t wait to show you!

Yardstick Holiday Tree

full-tree

I finished my yardstick Christmas tree last weekend! I have no idea how many cuts I made or holes I drilled, but I’m sure it took over 12 hours to make. While this is not a tutorial I’ll cover the basic steps in case someone wants to take this on for their own home. I thought of this idea last year and started bidding on yardstick lots from eBay. I collected from 80-100 yardsticks and was able to use most of them. Of course, that was last summer and I had planned on building this in October.

Last week I started by marking the angle of the tree and figuring out the most efficient use of the sticks. Then I used a chop saw to cut all of the lengths. I didn’t even try to keep them in order of length. I recommend drilling the holes with a Forstner bit set up with a jig on a drill press. I tried a regular bit, but the yard stick is too thin and rattled around until the hole was a chewed up mess.

Tree-baseNext year I’m going to modify the base, however the basic idea worked out this year.  I made a few last-minute modifications, which is why there are so many parts. Basically I bolted a galvanized steel pipe to a bucket and then filled it with rocks for stability. I can toss out the rocks after the holidays and store the light weight bucket. This almost worked, but the tree tilts easily and I need more support to keep the center rod straight. I have some ideas…

tree-close-up-3I then organized all the cut yardsticks by length (took longer than expected) and stacked them on a 6 foot piece of 1/2″ all-thread. The advantage of all-thread is the ability to use bolts to make the stack of yardsticks tight on the pole. I then connected to another 18″ piece that slid into the galvanized pipe in the bucket. That means the tree is 7″-6″ tall and about 36″ wide at the base. If I can find a longer piece of all-thread next year, I may add another foot or so at the base to make it even taller and wider!

close-up1I was planning on taking my cordless Dremel and drilling holes for ornaments, but the tree is already interesting enough as is. I found these cool little lights on Amazon and that seems like enough! The whole thing folds flat and is light enough for me to carry it to the basement for storage. I’m going to take a week or so off of posting so I’ll be back the first week of January. Happy Holidays to all!!