I think and hope that some of you are still out there waiting to see if I will ever blog again, and I’m back! The story? We’d been living in the same lovely city of Fort Collins, Colorado for many years. While we have fantastic friends there, we had eaten in the same places, taken the same drives, and visited the same attractions. We needed a change.
The list of requirements for our new location included: great food, galleries, museums, shopping, plus a moderate temperature range. Fellow textile artists were a must for me, and jazz musicians and clubs for my husband. Online research helped, then we rented VRBO homes in several potential cities. In the end my husband and I decided to move to Santa Fe, New Mexico!
Then we had to house hunt. Months later…
Then we had pack and store our belongings and began to remodel. Many months later…
Then we moved and started to settle in, which always takes longer than anticipated.
I have a bright large studio, my husband has 1/3 of the living room for his jazz jams twice a week. Life is good.
I tried to sew while we were remodeling, but I only managed an Alabama Chanin poncho which I will be wearing this summer. Diane Ericson’s DOLs and another retreat with friends kept me in the sewing loop. However, I went home to chaos and never finished anything. Until now!
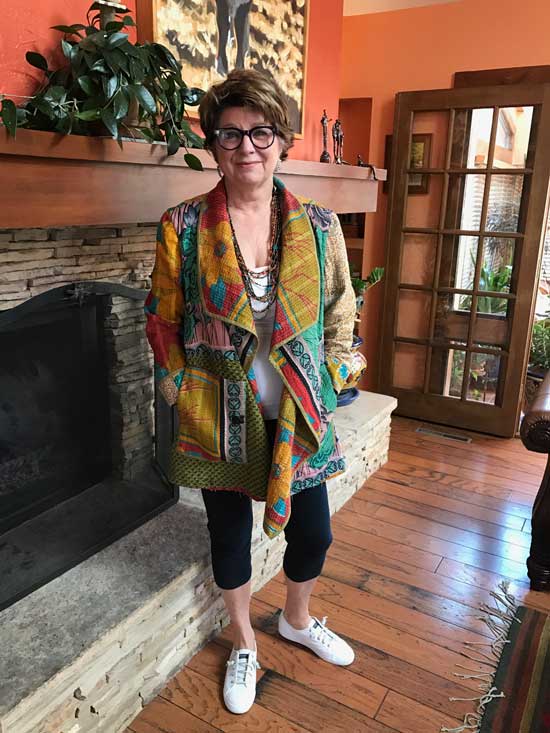
I’ve sewn several garments, made some jewelry, and taken up tapestry weaving. It feels so good to be making again! The purchase of a quilted Haori jacket inspired me by the simplicity of the garment and the potential for pattern changes and surface design.
The Haori (羽織) is a traditional Japanese hip- or thigh-length kimono-style jacket, worn over a kosode [kimono]. Wikipedia
I drafted up a pattern and following are the first three versions, and I have many more in mind!

Front 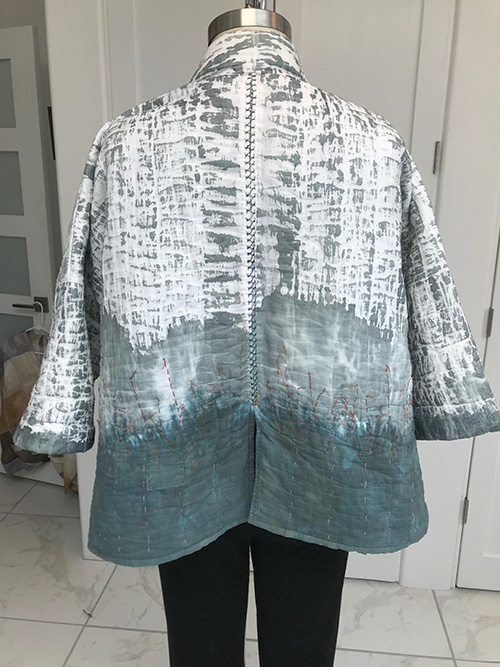
Back
This version was made with a twin white cotton quilt purchased in Taos! I cut the basic jacket and dipped the pieces into a bucket of fiber reactive dye. Then later at the Carmel DOL, I dry brushed the rest of the quilt with acrylic paint and sprayed some water on the middle space to blend. Frankly it was a gutsy move, but sometimes you just have to go with it! It was pouring rain and I think the inspiration is obvious. Hand stitching is used for the seams, pocket edges, and surface design. Slow sewing feels good after so much chaos in my life. This jacket kind of floats when I wear it! Warm and cool at the same time, and I’m finding this piece to be perfect for spring.
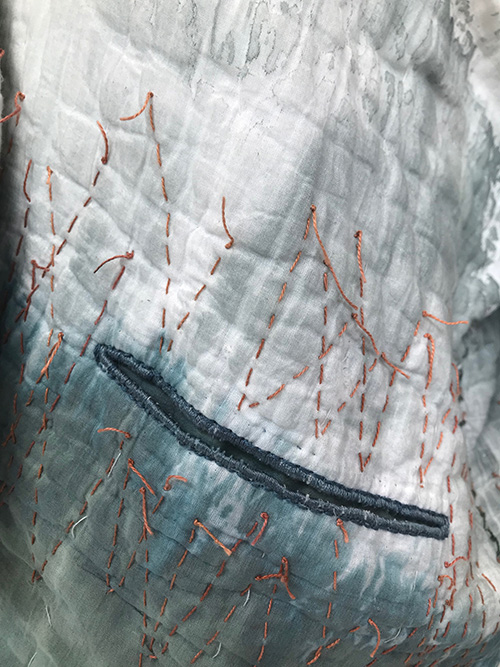
Hand Bound Pocket 
Seam Detail
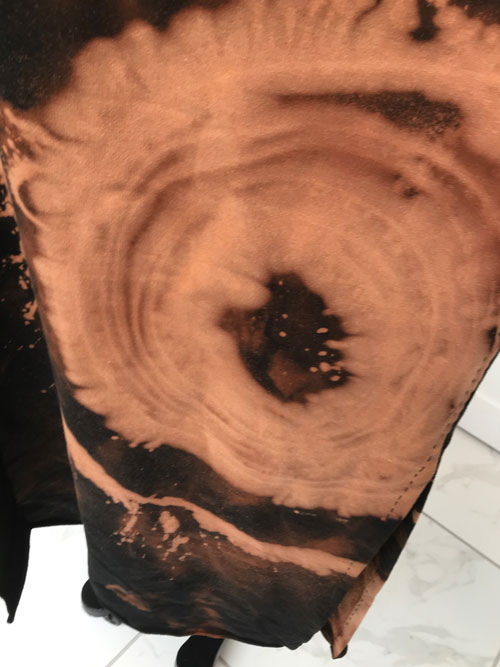
The second version is the same pattern but with 12″ added to the length. A bamboo knit from Marcy Tilton is a soft yummiest textile that I can wear just about any time. The length is perfect for travel as both a jacket and robe.
Front 
Back
I experimented with diluted bleach in a squeeze bottle to get the orange color. Then I printed some stencils on top. The fabric can have a raw edge, so the pockets are just hand stitched around the openings. It may be a little over-the-top, but I love it!
Bleach detail 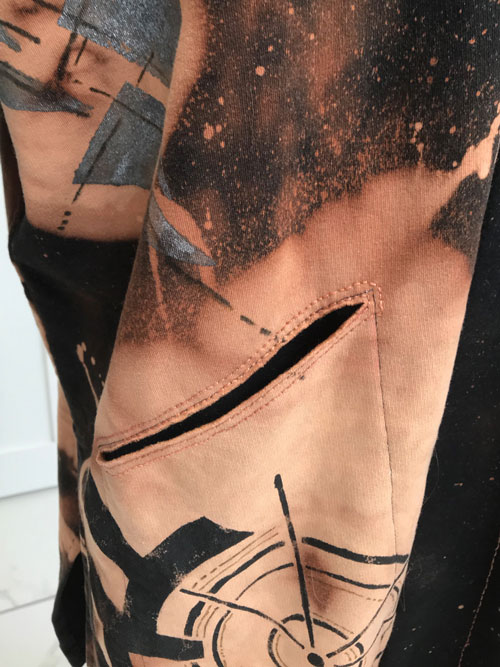
Pocket and Stenciling
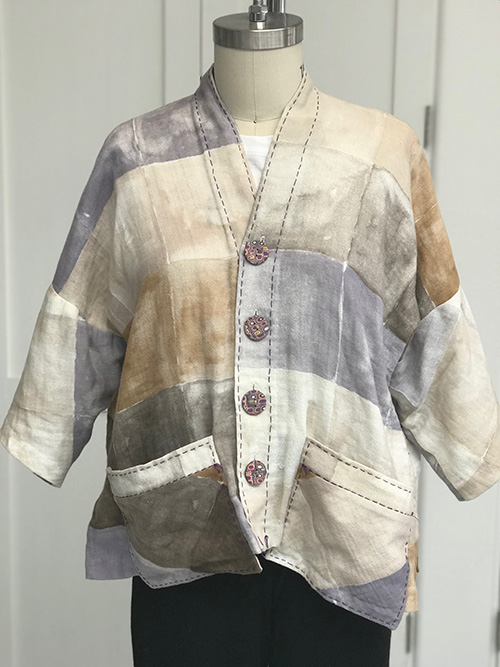
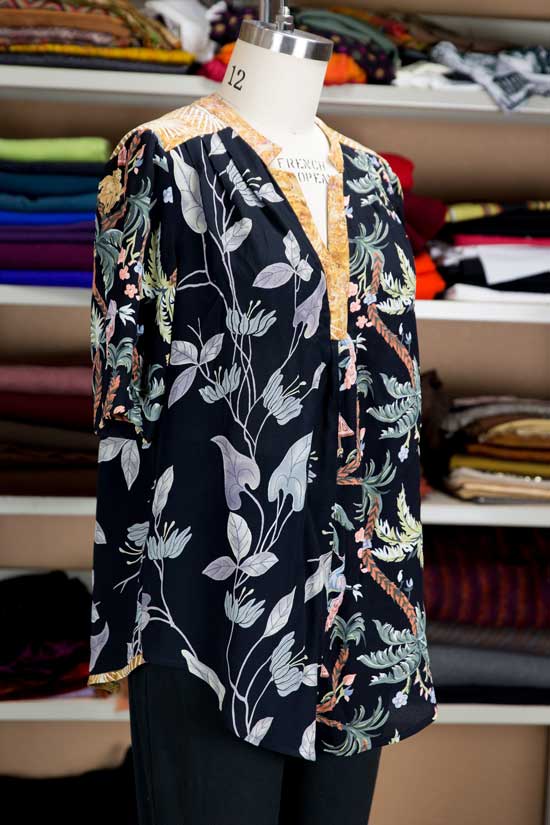
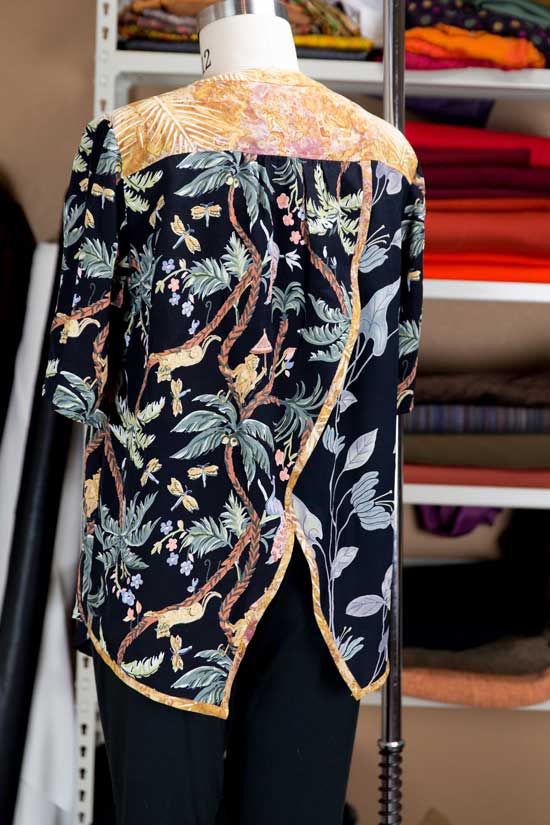
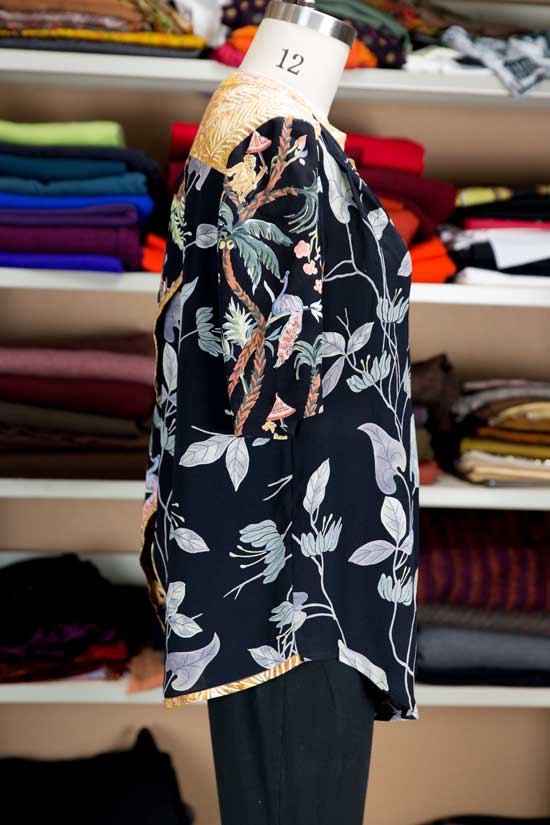
After two jackets, it seemed like a shirt might be possible. Same pattern, but with a lovely Japanese double gauze that has been in my stash forever. The patch pockets extend below the hem for a bit of interest.
Front 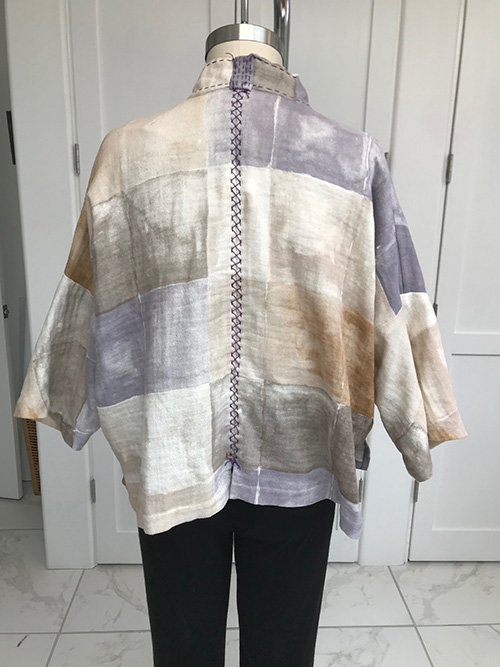
Back
The Sandra Bruce buttons just clinched the look for me! There really wasn’t enough fabric, so I had to embroider (hide) the back collar seam detail, and place the sleeves and pockets on an angle. I kind of love coming up with solutions that look more interesting than the expected.

Buttons and Pockets 
Back neck
I have already finished some other projects so I hope to blog again soon!


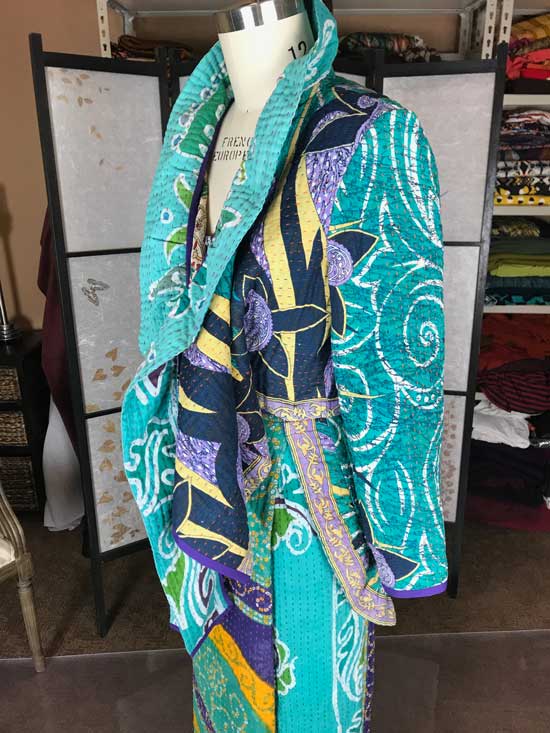
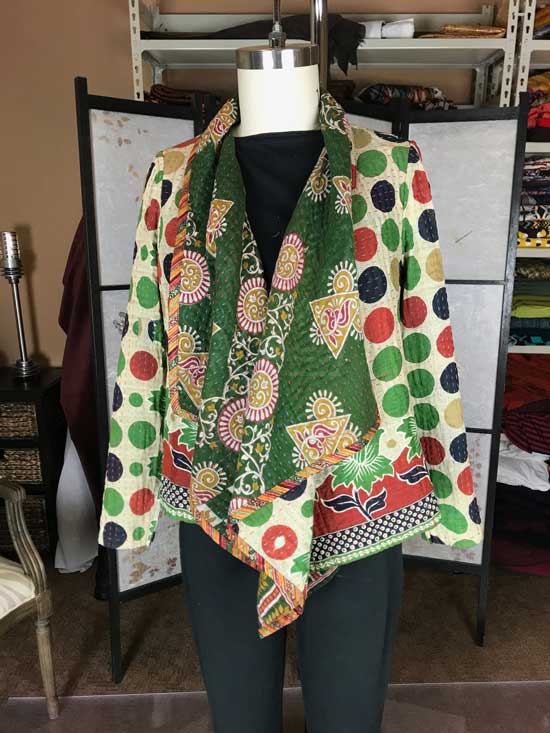
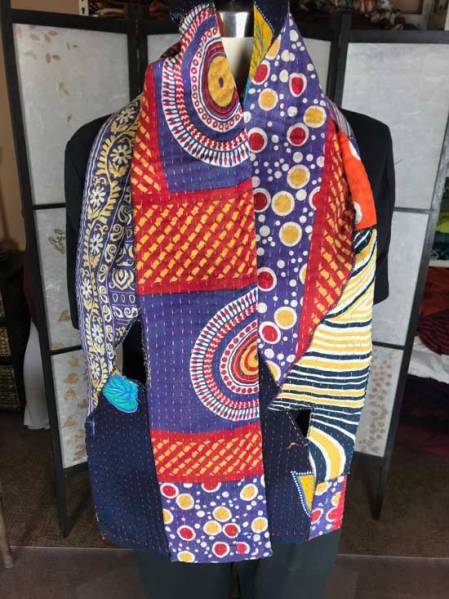
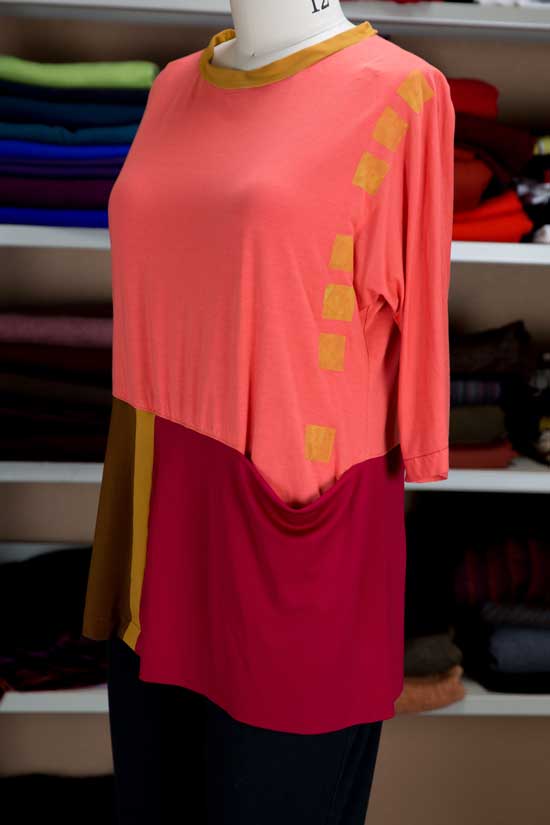
 This next piece I may buy for myself! I just love the colors and the fun polka dots on the reverse. We used the finished edges of the quilts when possible, but sometimes used binding when needed. Most of the seams are flat-felled.
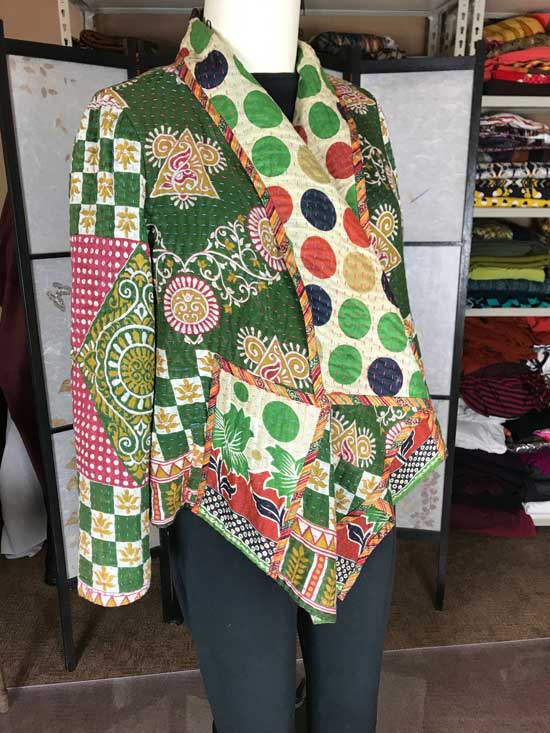


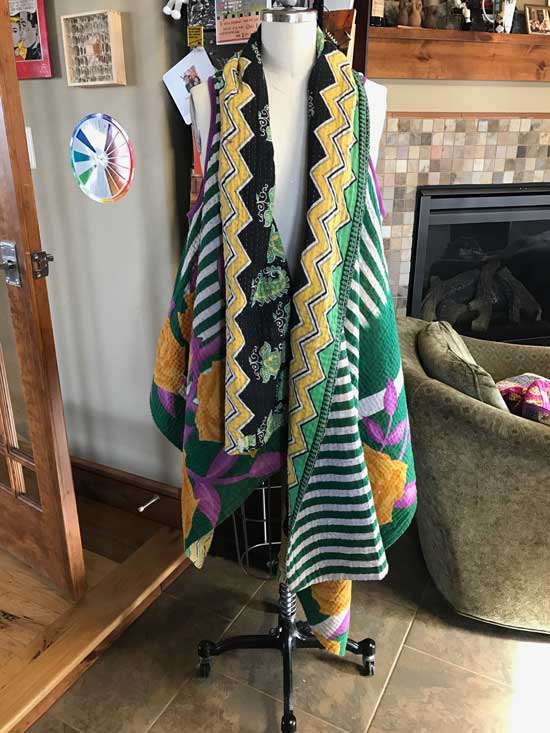
 Finally here are a few of the accessories made from the scraps and they are all reversible.
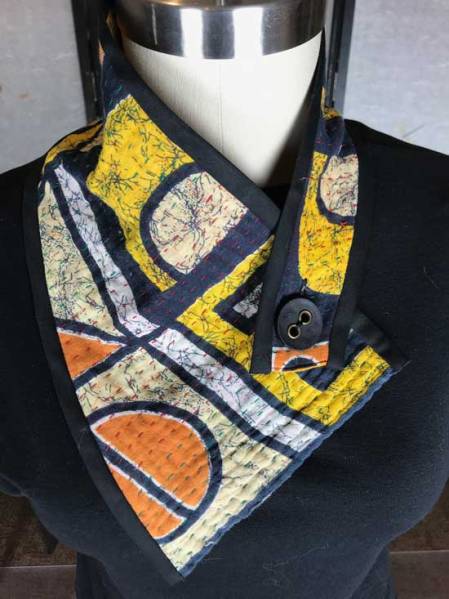


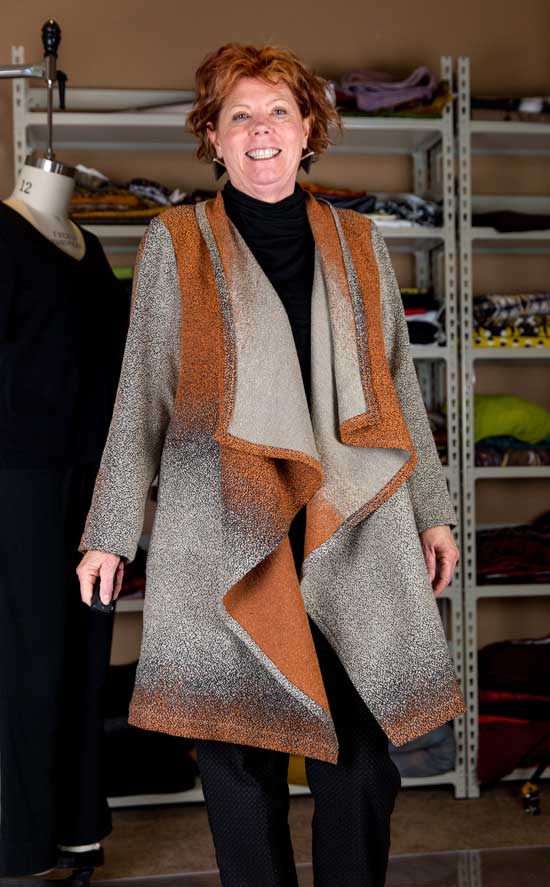
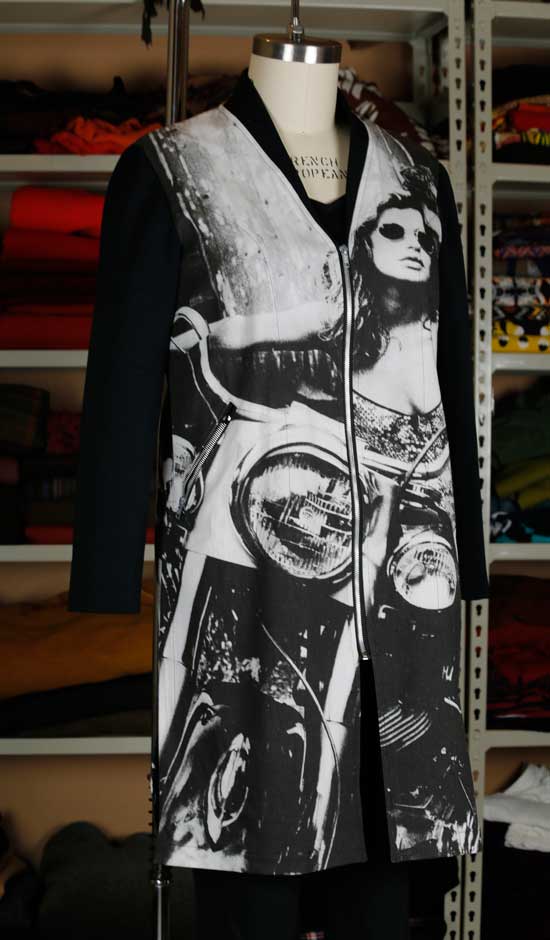 I always find it interesting when coincidences keep popping up in a project. First, I suddenly decided that NOW was the time to sew up this cool panel denim fabric from Marcy Tilton. I’m not the only one who pulled this from their stash this month. Marcy sent an email picturing a short jacket the day after I wore mine for the first time. The second coincidence is the other sewer also decided on black sleeves. I was also going to make mine in black denim, but couldn’t find the right fabric.
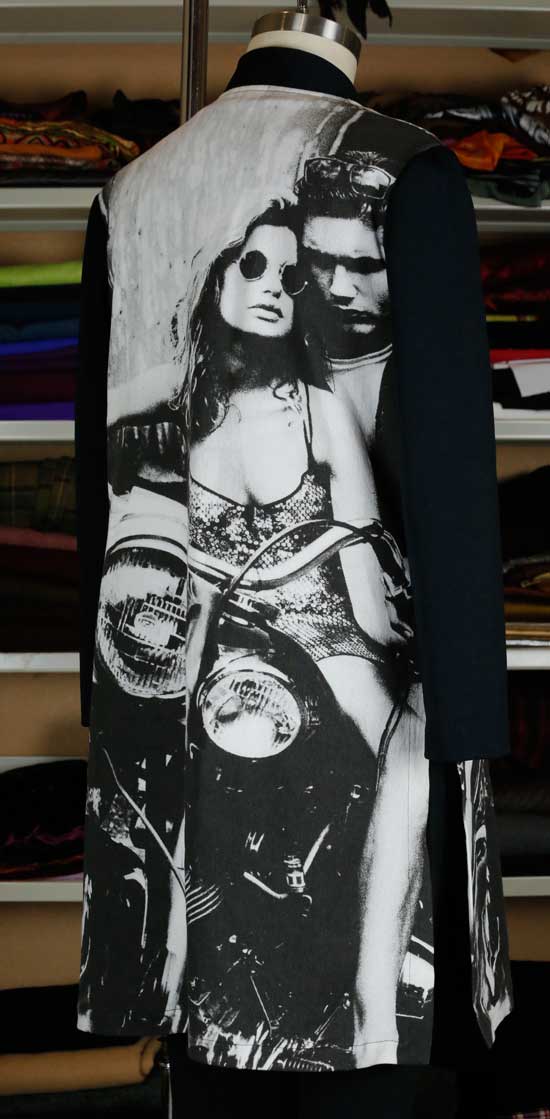
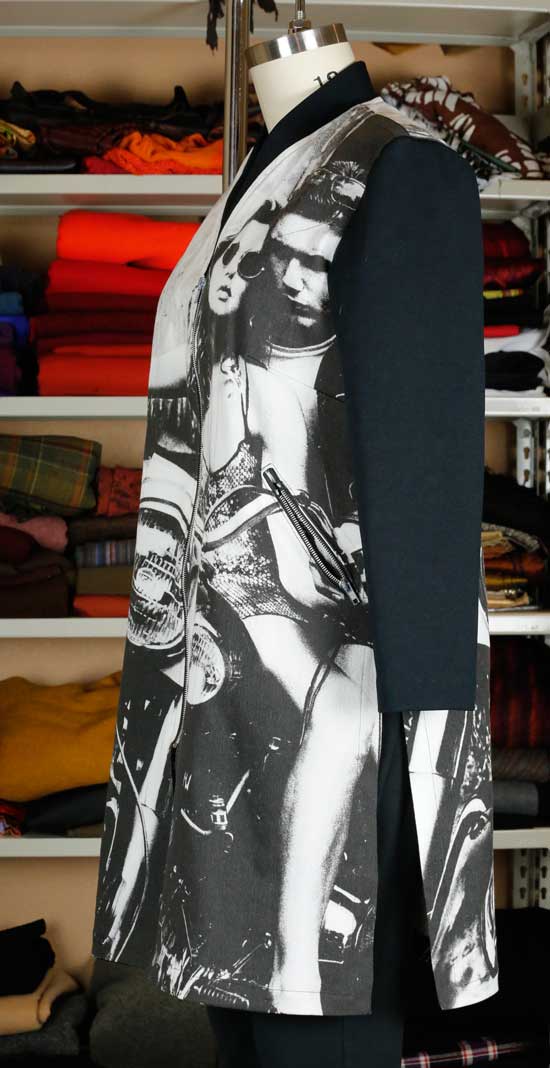

 Knowing that there is always a solution I cut out and stitched together the body of the coat. Then I draped the fabric at the arms and decided that it looks even better with the stripe running down the arm. I love that the inside seam is orange against tan. I’m so glad I didn’t have enough fabric! By cutting the sleeves cross grain I gained enough scraps to make two perfectly matched patch pockets lined in a different fabric.
 I’ve been sewing but in such small periods of time that I never had time to photograph and blog. It’s amazing how much can be accomplished with an hour or two here and there, but I find it very inefficient. Each time I have to review what last happened with the project before proceeding to the next step. The holidays are coming up and I need to switch gears to gift giving projects, but for now I’ll try and catch up on what has been on my sewing machine for the last month, and it’s going to take a few photo sessions and blogs to cover it!


 I’m ready to start making fall clothes, my favorite time of the year, but next summer I think I will come back to this pattern with a light linen and maybe some hand stitched details, or some machine embroidery along the placket. It’s nice to think that around March I may already have a project!
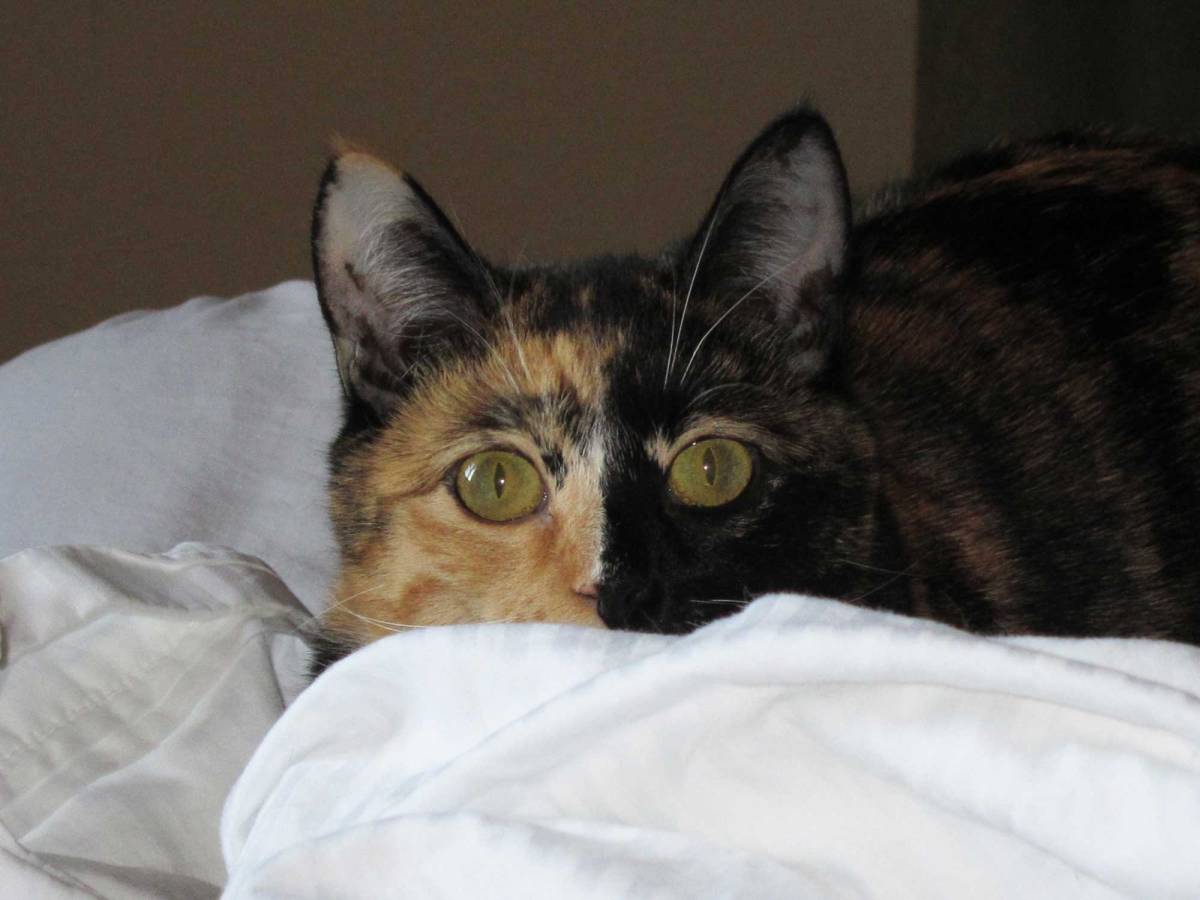 I entered my cat Zatoichi (Ichi for short) for a spot in the calendar of Fort Collins Cat Rescue our wonderful local cat shelter where she came from. She’s now one of the 30 finalists and would dearly love to be a Miss September (or January…) and help the shelter. Please go to


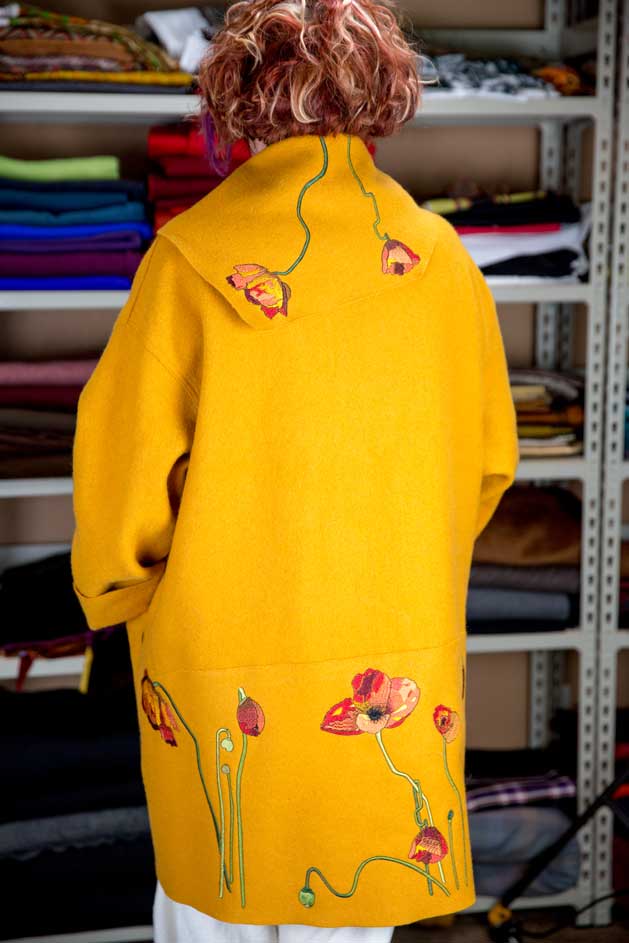
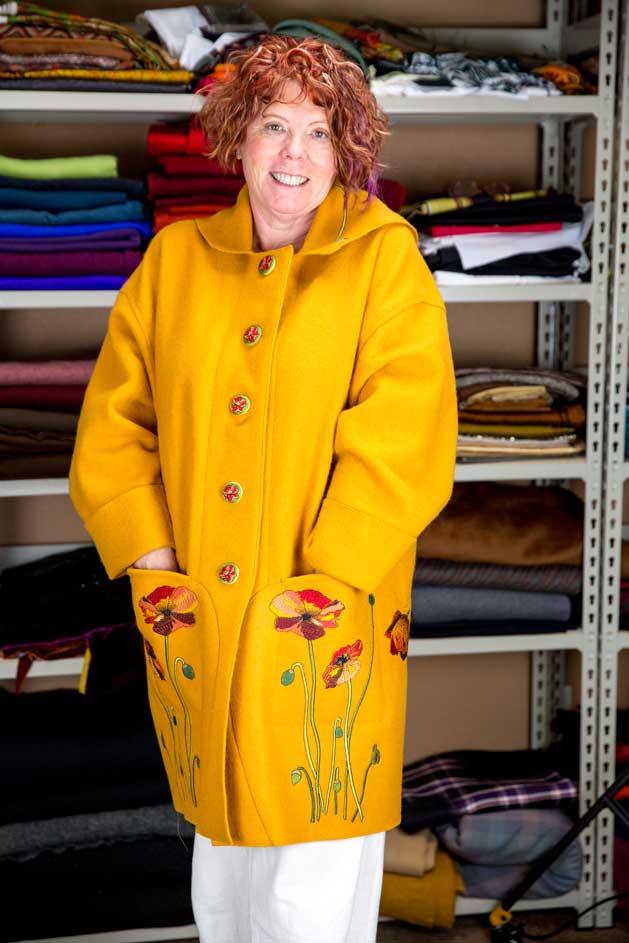 I decided to copy an old favorite unlined coat. I always pull it out between seasons because the single ply of wool is the perfect weight, but it’s grey and looks a little blah in spring. However, the oversized fit gives enough room for anything from dolman sleeves to another layer beneath. To celebrate spring, I wanted embroidered poppies around the hem of the coat. I looked all over for the set of embroideries I evisioned in my mind, but to no avail. Just as I was giving up, my neighbor’s poppies began to bloom! I have software. I can draw. YES, I can do this!
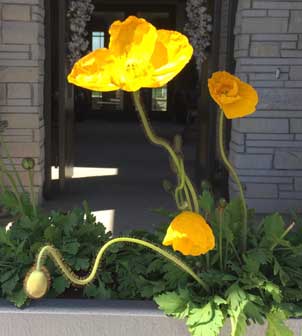 The second step was to simplify the photograph into a line drawn cartoon. This needed to be done since the number of embroidery threads used should be kept down to a reasonable number. I have a single thread embroidery machine, so I need to rethread for each color and the final embroideries have about 14 colors.
  The third step is to scan the freehand cartoon and open it up as a layer in a drawing program like Adobe Illustrator, then complete a vector drawing. The embroidery software I purchased from Husqvarna Viking has a drawing module that is fairly simple to use, but I’m used to the feature rich Illustrator. This part takes awhile, at least for me. I spent time fussing around with the composition by moving the flowers, changing their sizes and even moving flowers from one photo to another to balance. There are three separate embroideries on the coat plus some small designs for the buttons and the collar.
 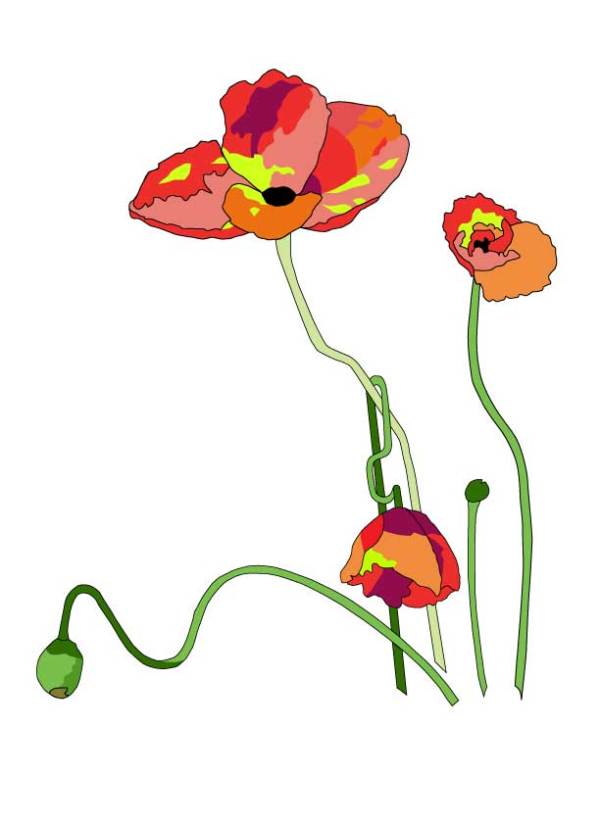 I make all of this sound very straightforward but the truth is I’d never attempted such a complex project, and most steps had to be done more than once. The good thing is that I continued to find faster ways to accomplish my goals. Next time should be much more efficient!


 The other linen pieces come from my stash and were made into a rectangle of pieced fabric that I then draped on Roxanne. Cool, this is going to be easy!
  The back panel also needed to have a mix of fabrics so I decided to make a diagonal slice on the patchwork piece to make a wedge for the back. This seemed like a great idea and here is the back panel on the floor. However, all the angles started getting confusing on such a large project.
  A shirt would have been much easier to manipulate, but I persevered adding more black linen until I had back and front rectangles to form the caftan. After sewing the shoulders it was time to look at the neck. It’s difficult to see, but I’m intrigued with this idea of a turned rectangle to form an asymmetrical neck. The shoulder seam is the black to black seam starting on the lower left hand side of the photo. The other shoulder continues diagonally across the rectangle to the upper the right hand side of the photo. Unfortunately, in the end the neck was too big, and I’m not a big fan of my bra straps showing. I played around with the neck later and came up with a solution, but I would love to perfect this idea in another project.
 So at this point the project looks cool on Roxanne so I try it on. It looks terrible on me!!! Too much fabric…we’re talking full size tent, and it’s heavy! Time to start chopping!
  I decide that instead of a classic rectangular caftan that I will just cut into the sides forming sleeves as you can see in this photo of the back.
 This reduced the bulk by about half so I decided to focus on a pocket. I’m very fond of how the pocket came out. However at that point the caftan still fit poorly. The photo below is after all the tweaking, and you can see I lost a little of the pocket opening when I took more out of the sides.
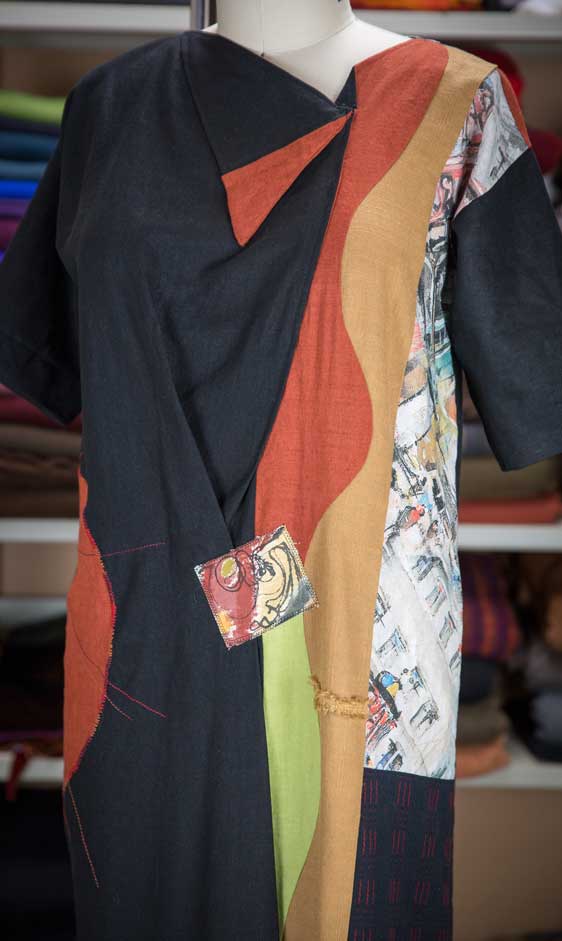 You can also see how I resolved the neck. Hopefully it looks intentional…The outfit is fun, I will wear it and most of all I enjoyed the process and learned a lot!