Poppy Embroideries

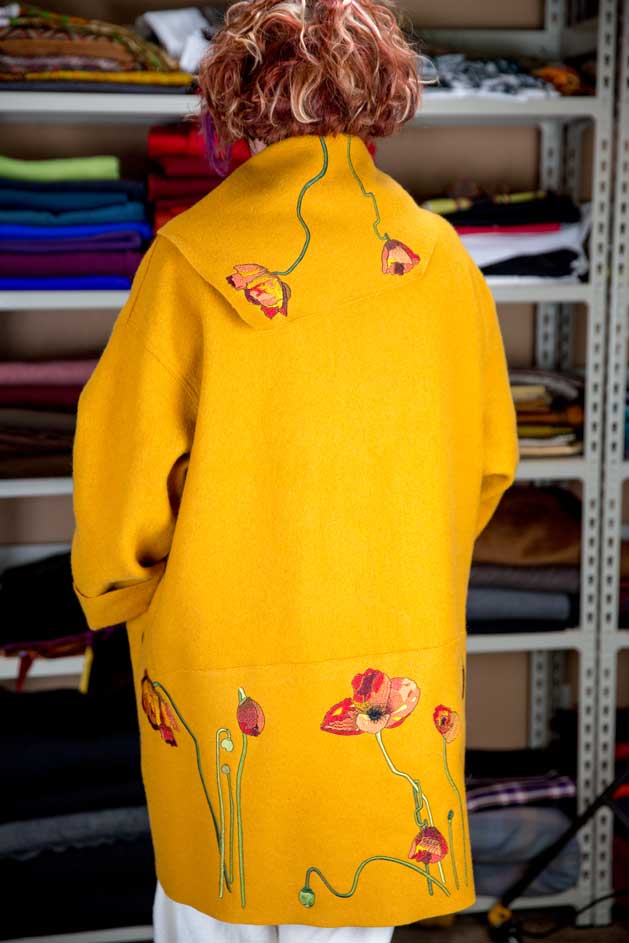
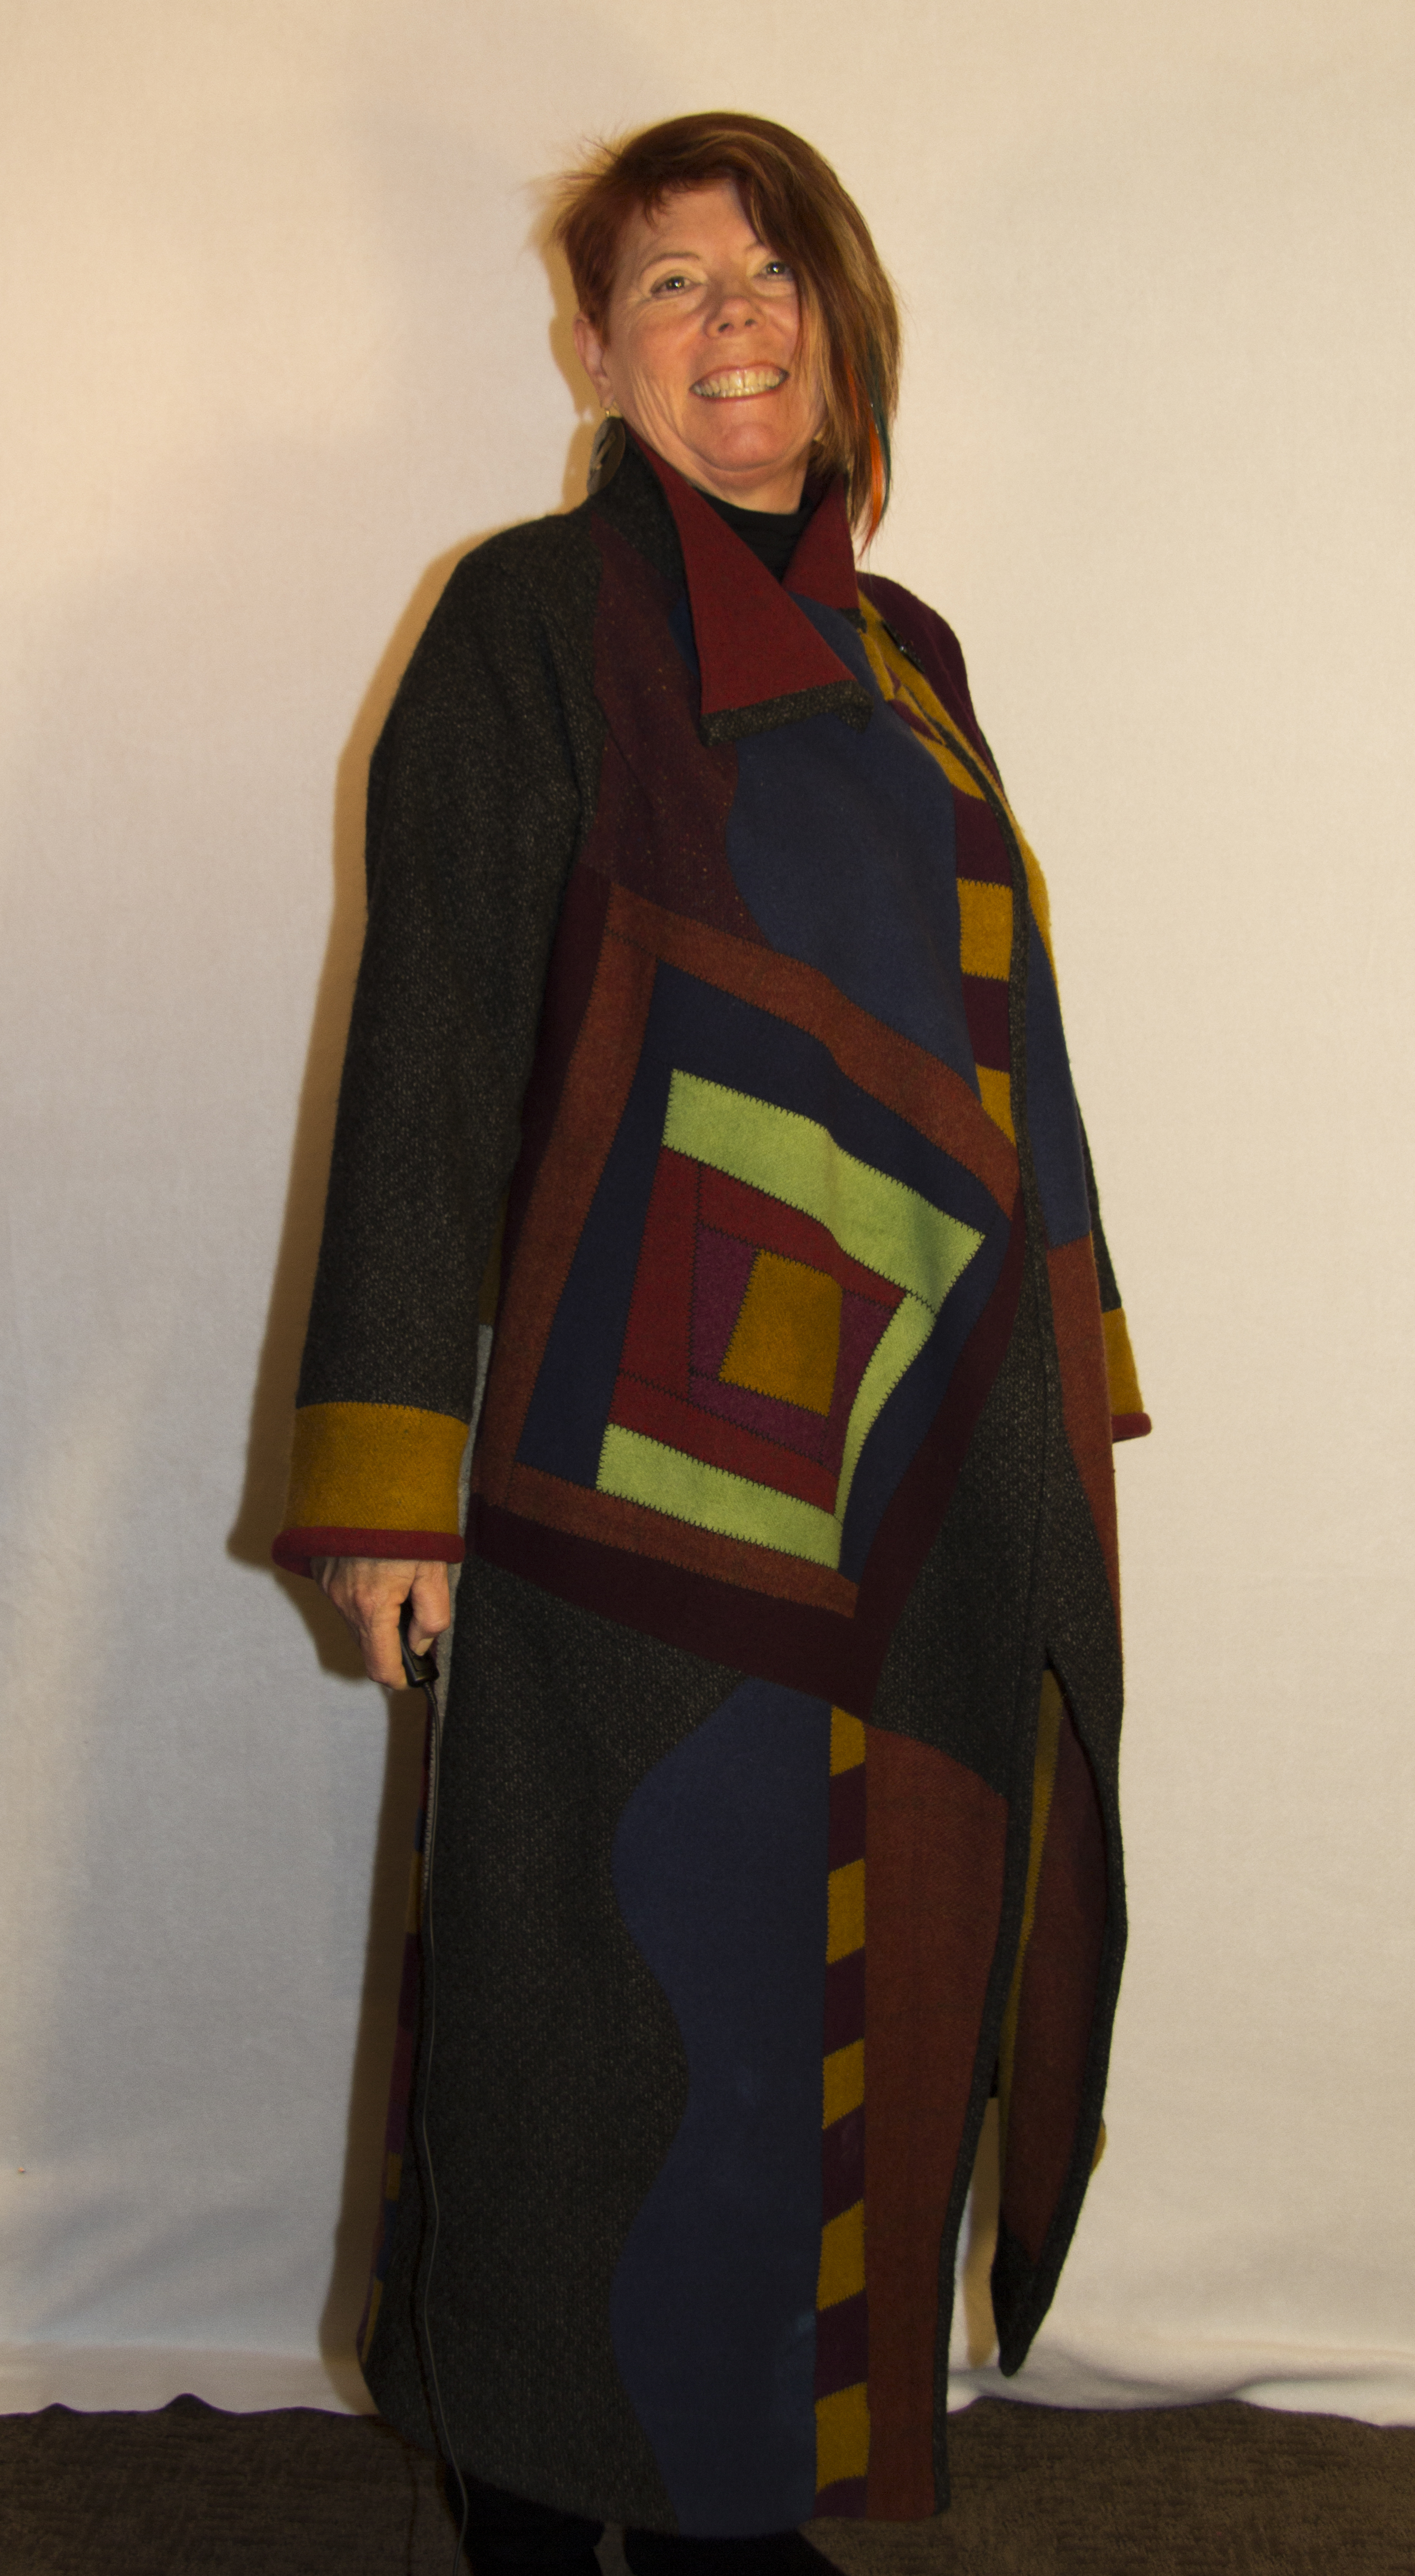
My spring coat is finally finished! While it’s too late for spring, I hope that by wearing it in fall the feeling of summer will be extended a bit. This was a big project!     2016-07-03-11.53.22-8I decided to copy an old favorite unlined coat. I always pull it out between seasons because the single ply of wool is the perfect weight, but it’s grey and looks a little blah in spring. However, the oversized fit gives enough room for anything from dolman sleeves to another layer beneath. To celebrate spring, I wanted embroidered poppies around the hem of the coat. I looked all over for the set of embroideries I evisioned in my mind, but to no avail. Just as I was giving up, my neighbor’s poppies began to bloom! I have software. I can draw. YES, I can do this!

The first step was to take some snapshots of her poppies. I wanted red poppies and some were golden, but as long as the values are there you can change the color later.PoppyBThe second step was to simplify the photograph into a line drawn cartoon. This needed to be done since the number of embroidery threads used should be kept down to a reasonable number. I have a single thread embroidery machine, so I need to rethread for each color and the final embroideries have about 14 colors.   drawing-web
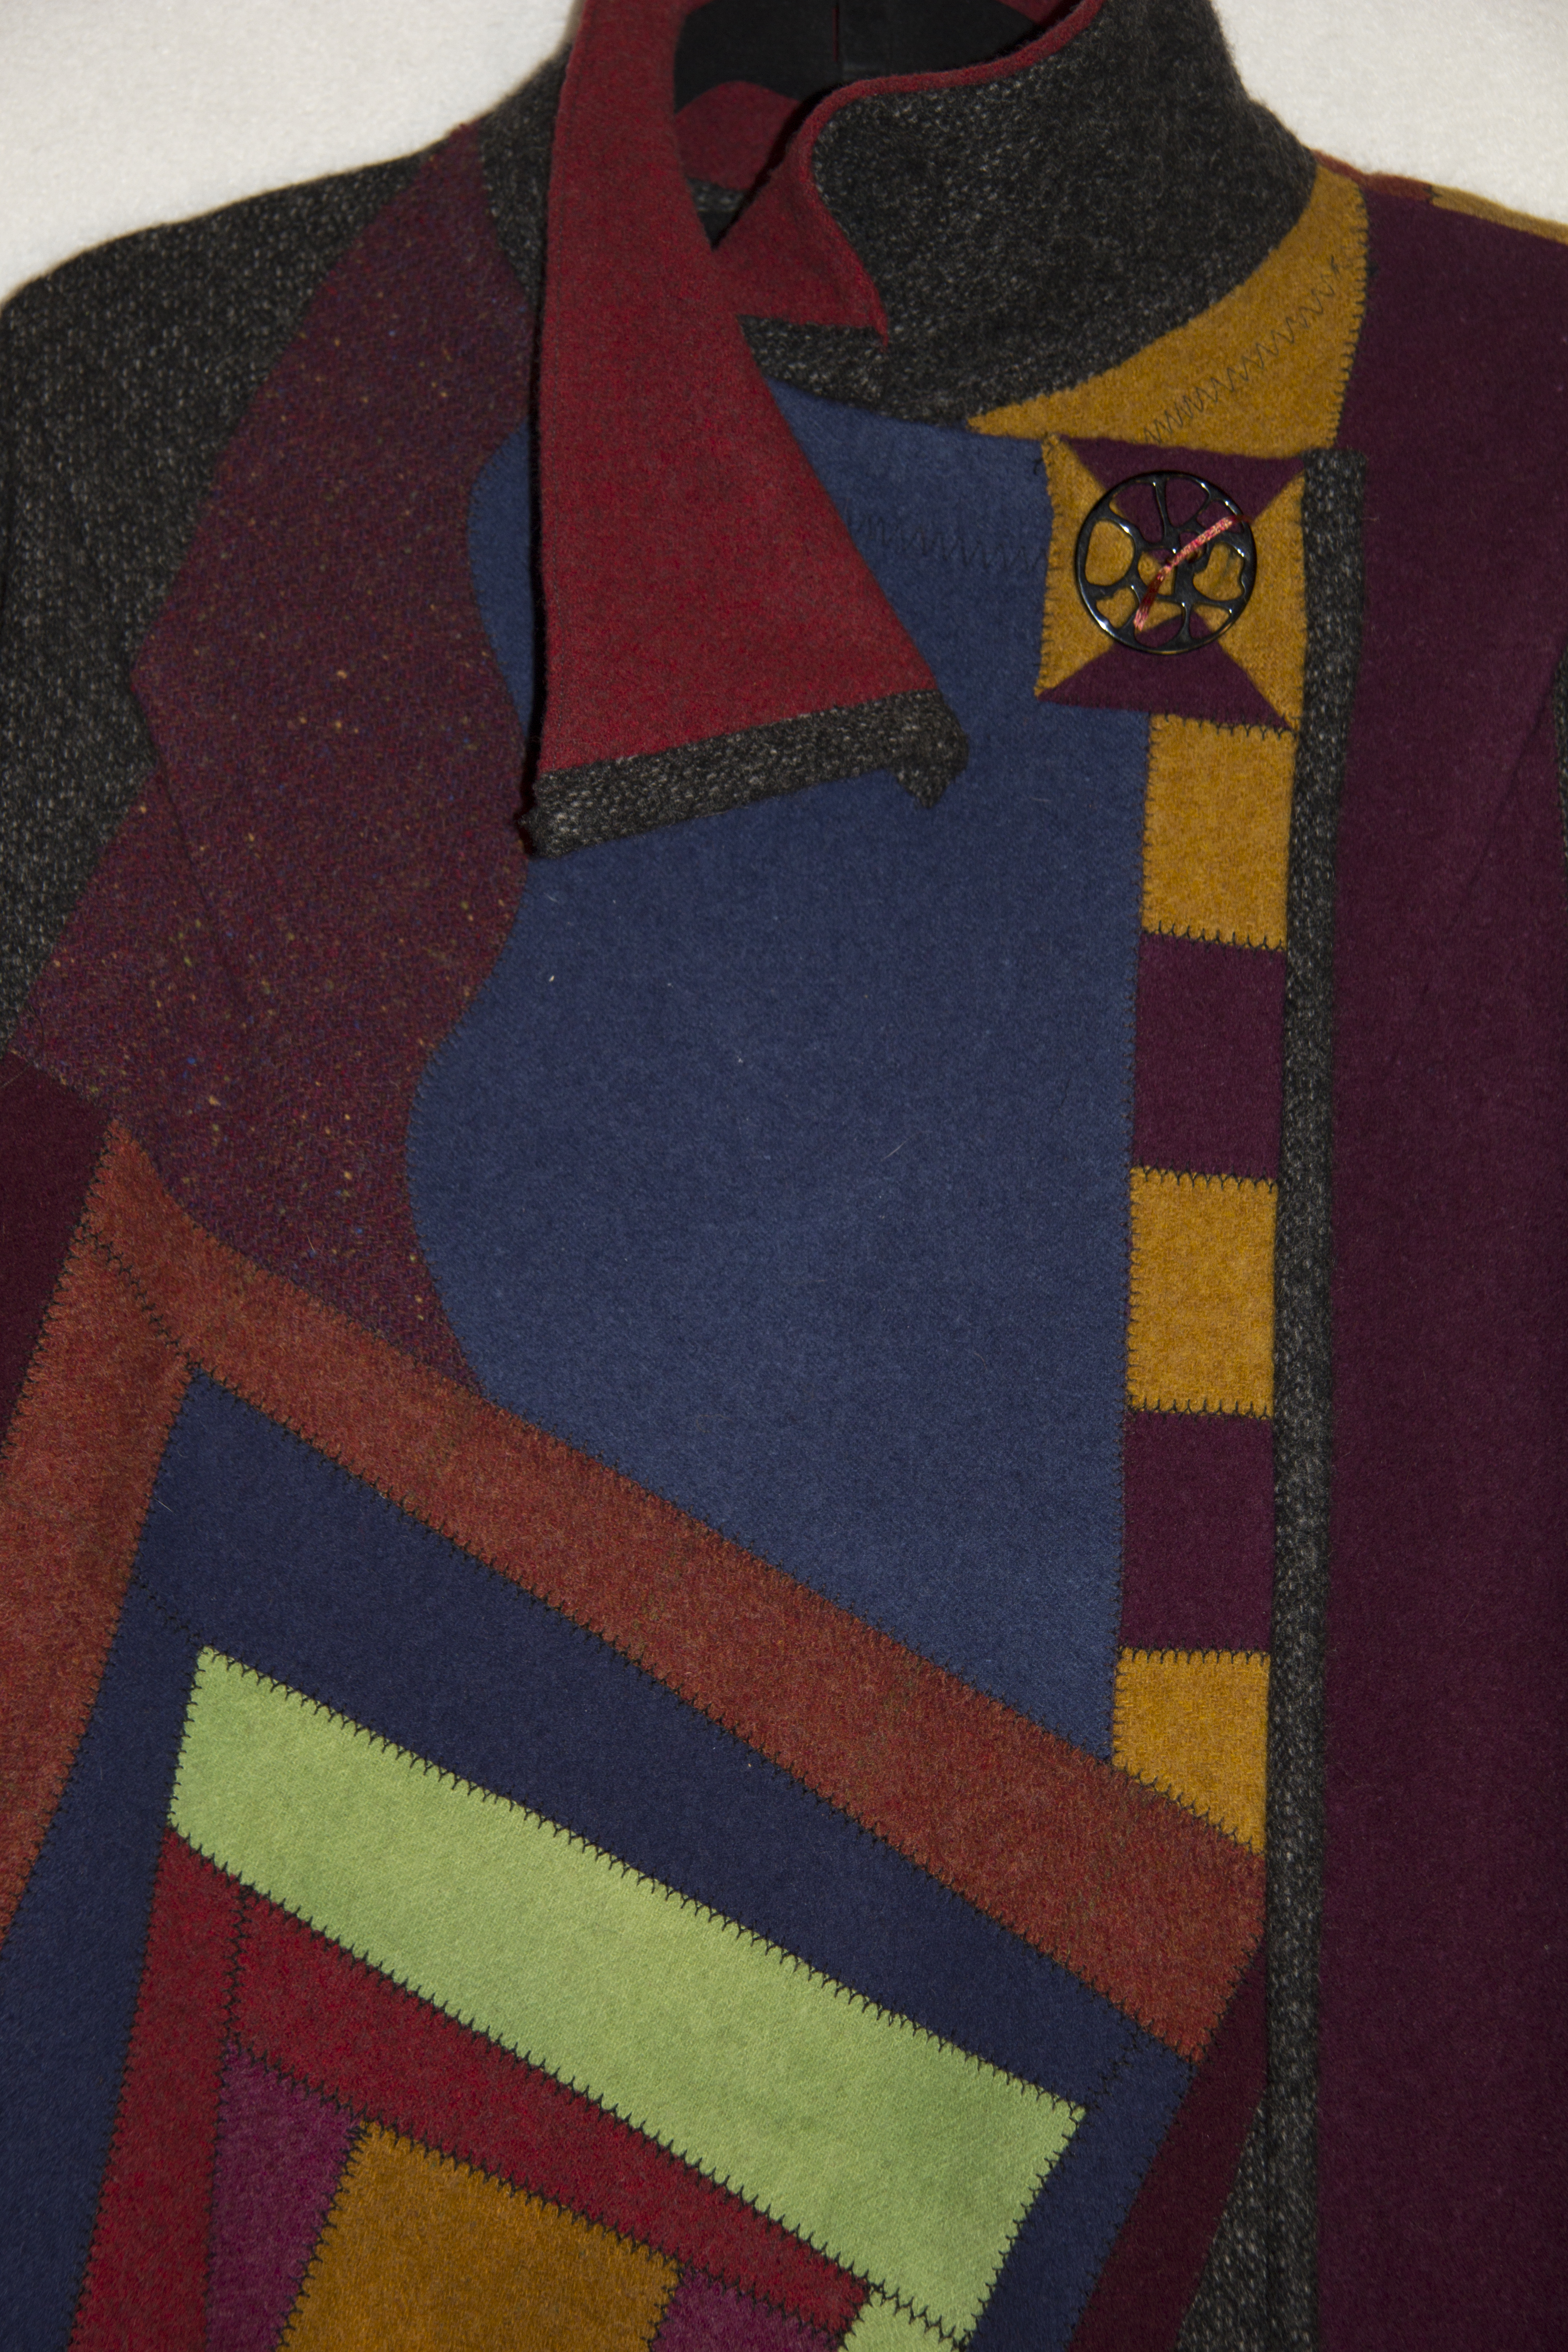
The third step is to scan the freehand cartoon and open it up as a layer in a drawing program like Adobe Illustrator, then complete a vector drawing. The embroidery software I purchased from Husqvarna Viking has a drawing module that is fairly simple to use, but I’m used to the feature rich Illustrator. This part takes awhile, at least for me. I spent time fussing around with the composition by moving the flowers, changing their sizes and even moving flowers from one photo to another to balance. There are three separate embroideries on the coat plus some small designs for the buttons and the collar.      poppies1_042316 I make all of this sound very straightforward but the truth is I’d never attempted such a complex project, and most steps had to be done more than once. The good thing is that I continued to find faster ways to accomplish my goals. Next time should be much more efficient!

After the drawing is done the embroidery software takes over. The basics of the software are incredibly easy. Just point your mouse to an area and the software will fill that area with the embroidery pattern of your choice! Of course, that wasn’t good enough for me…I wanted shading, and the stitches to change direction on the petals, and satin stitch on the stems, and different weights of black outline. You get the picture, I basically nerded out for hours, and here are the final stitch outs before I put them on my coat.

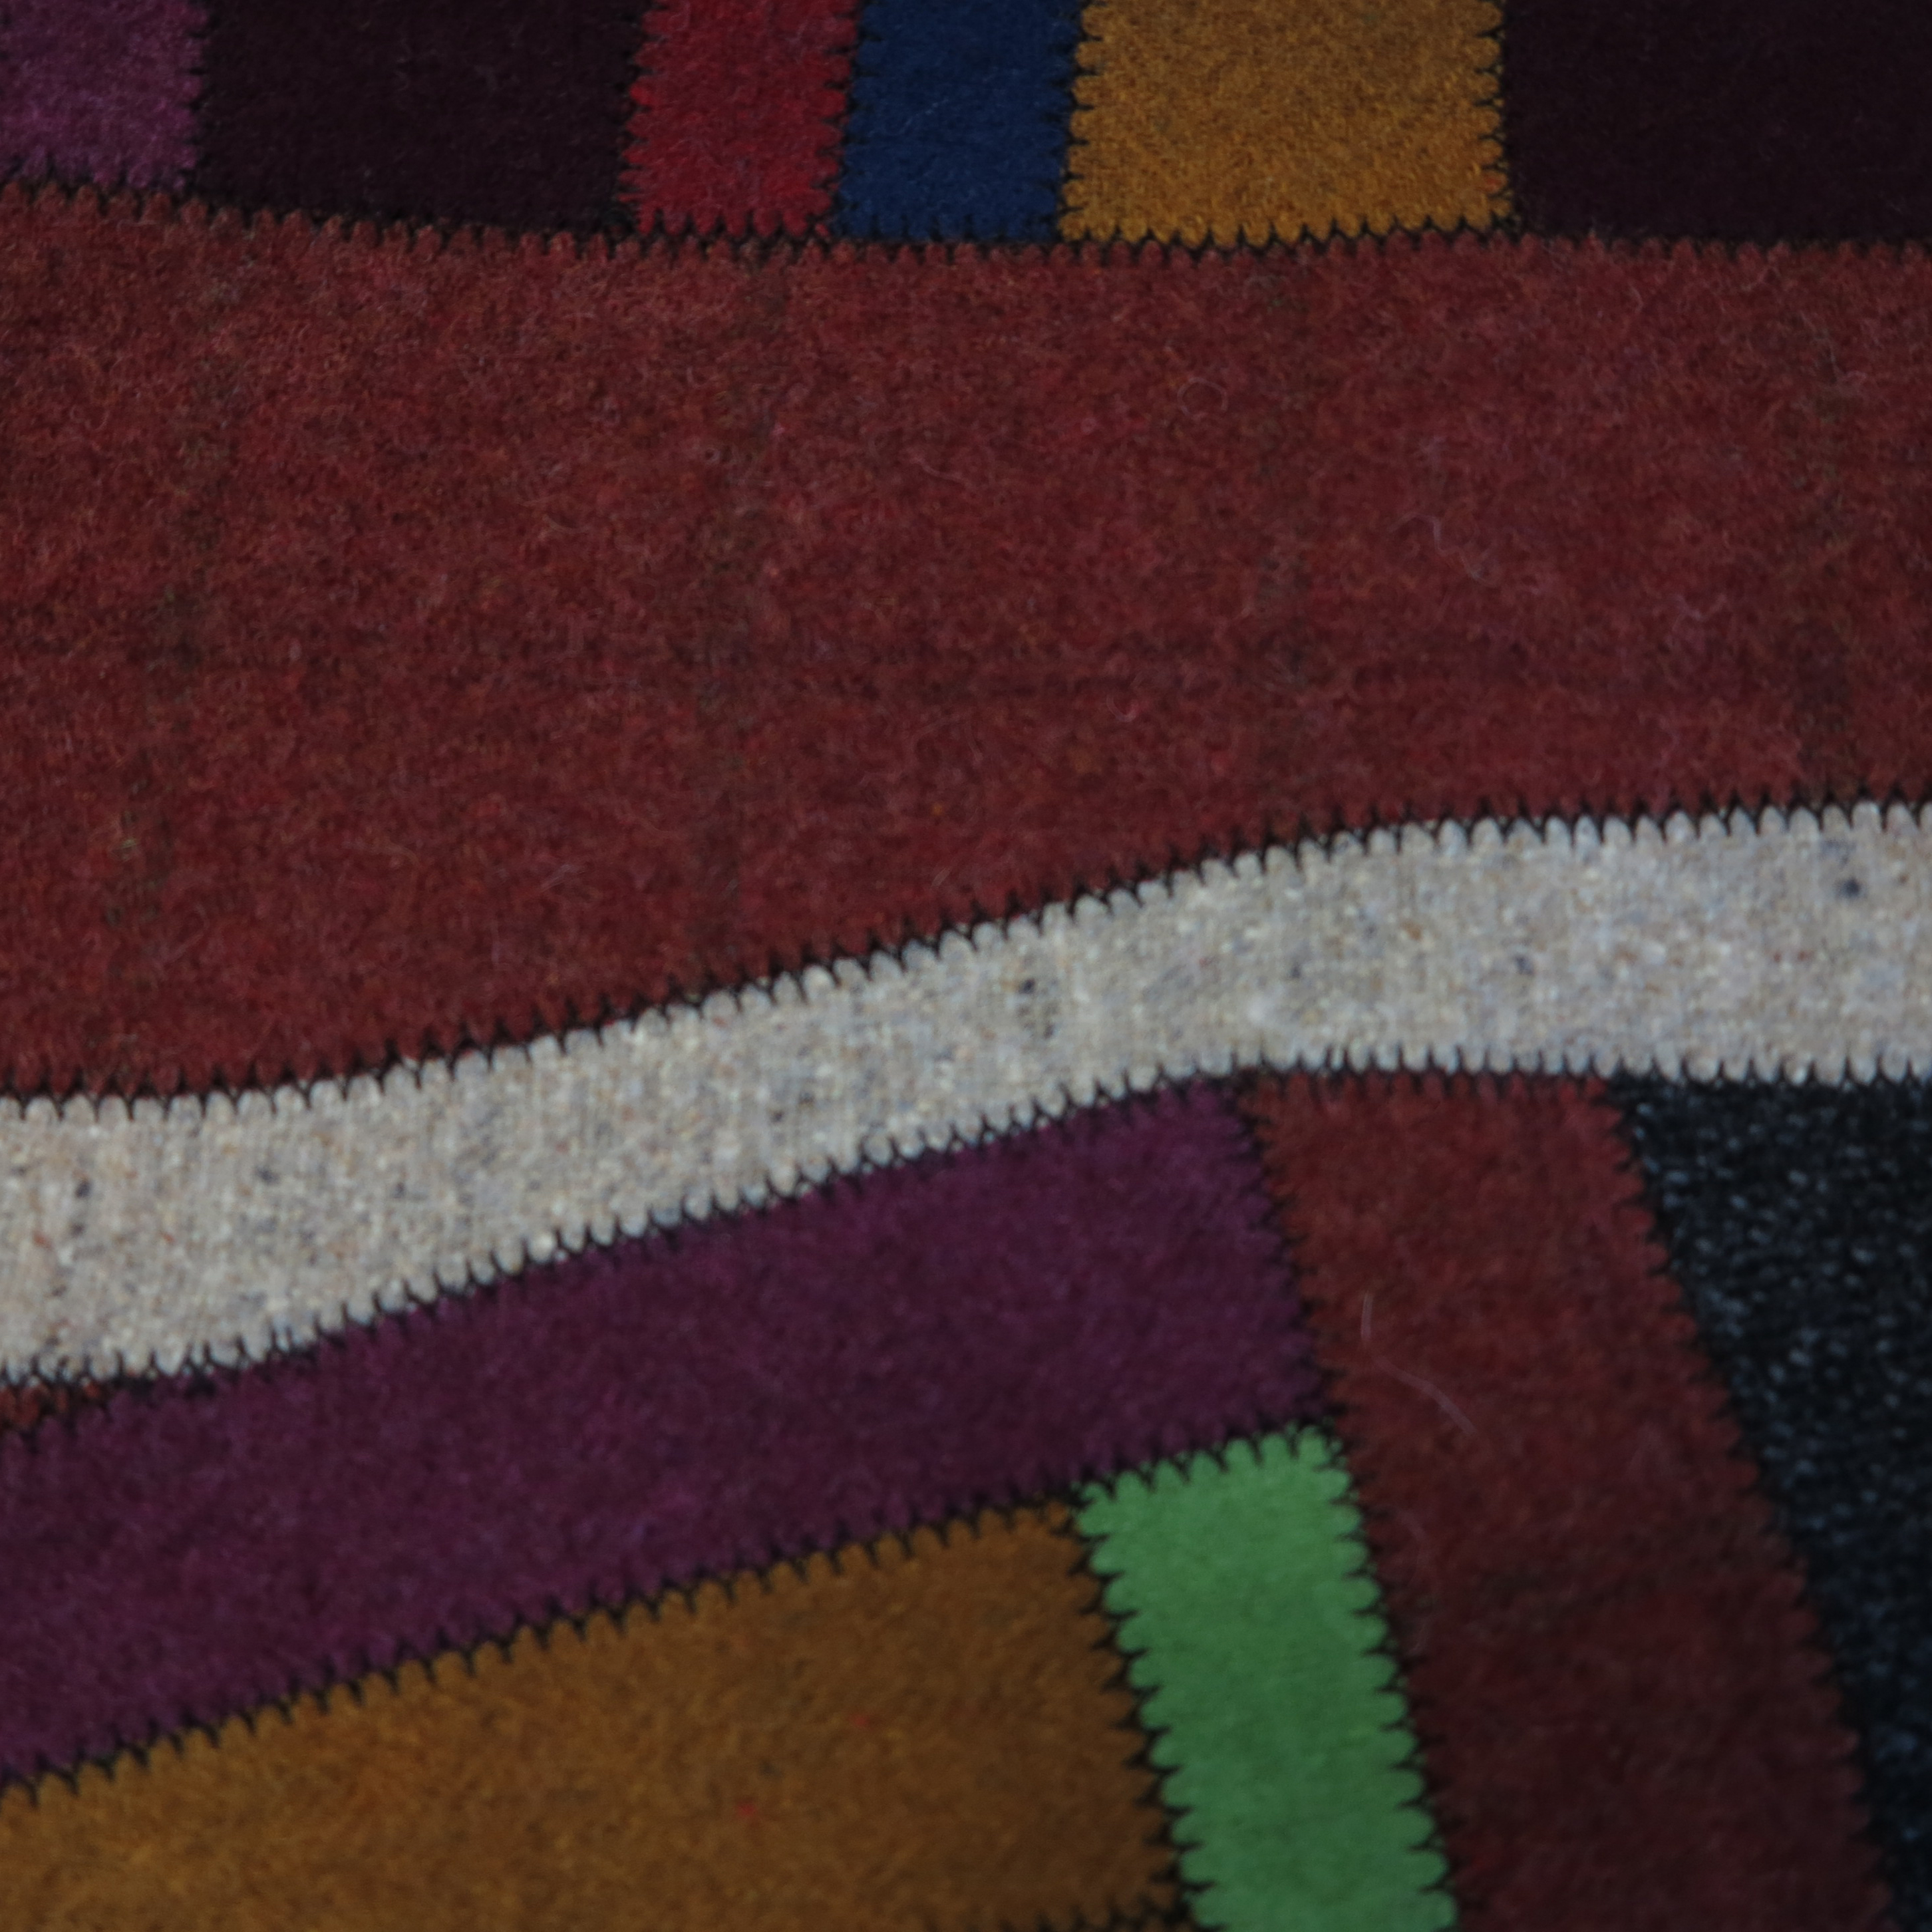
I didn’t want the back of the embroidery to show inside the coat, and I was running out of fabric! I found a length that was uneven along the top and almost the width of the bottom hem. I then let this found shape lead me to the placement of the embroideries and the curve of the pocket. I like letting the fabric make decisions for me, and I think the pockets came out better than the straight ones that I’d planned. If you look closely you can see the bottom hem is actually two layers.2016-07-03-11.55.24-19

2016-07-03-11.54.33-16

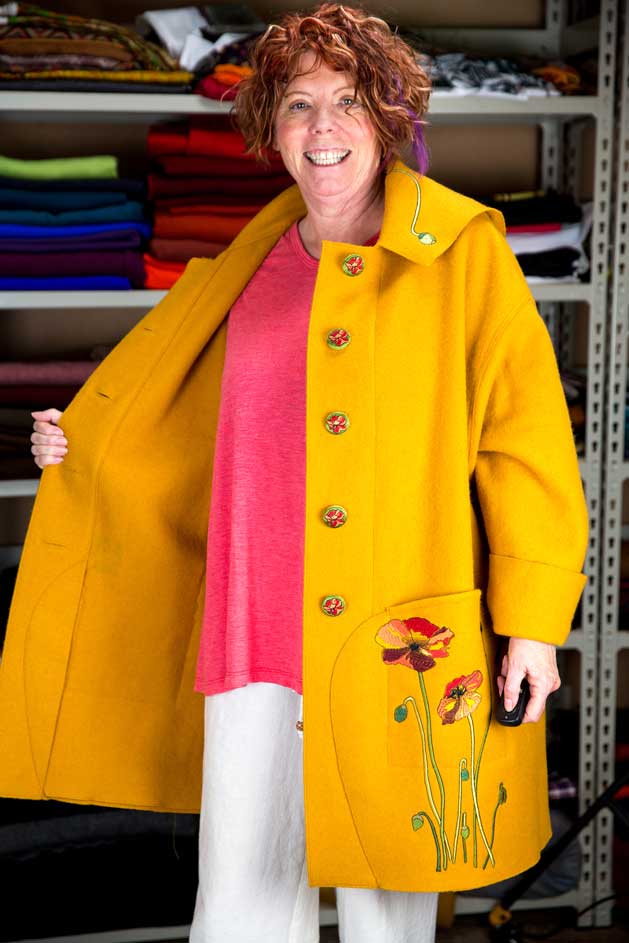
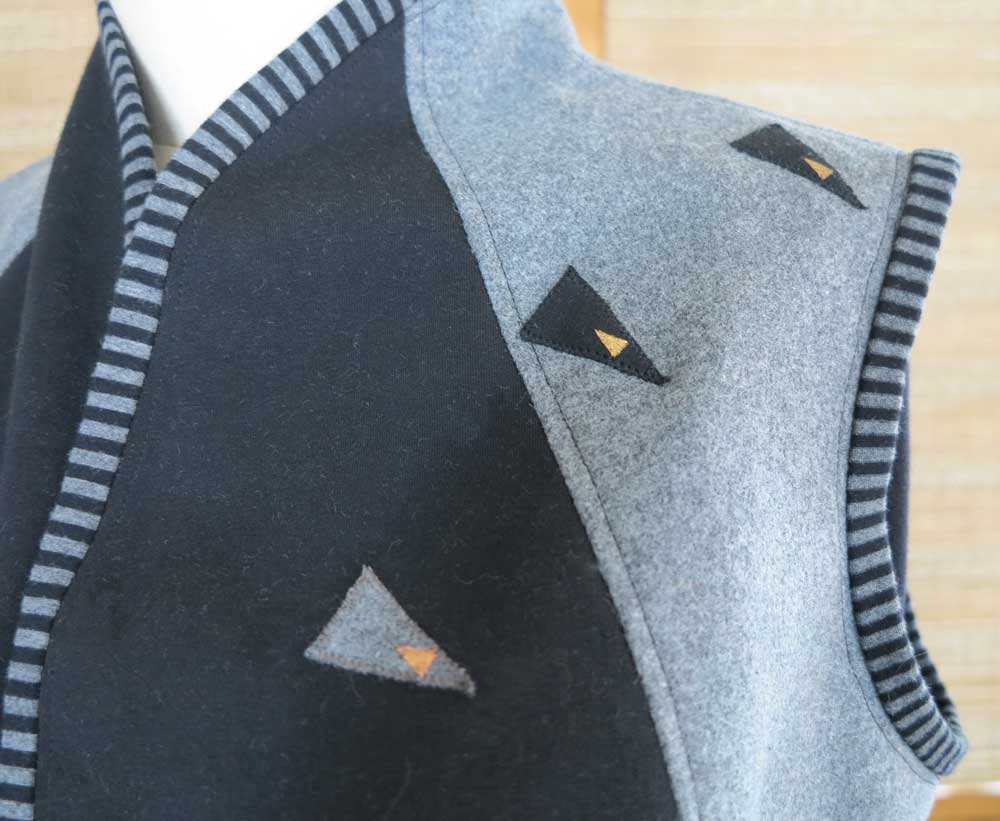
I also designed matching embroidered buttons!2016-07-03-11.50.53-2

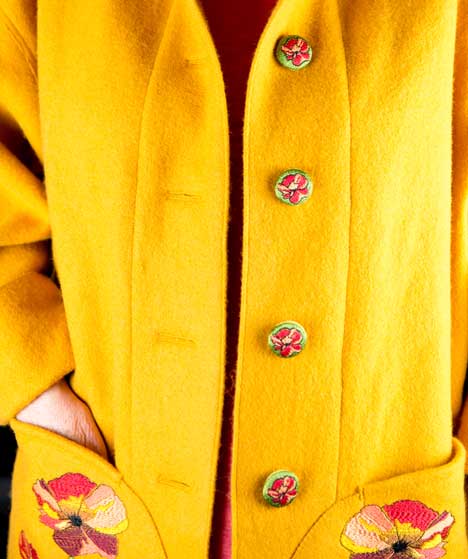
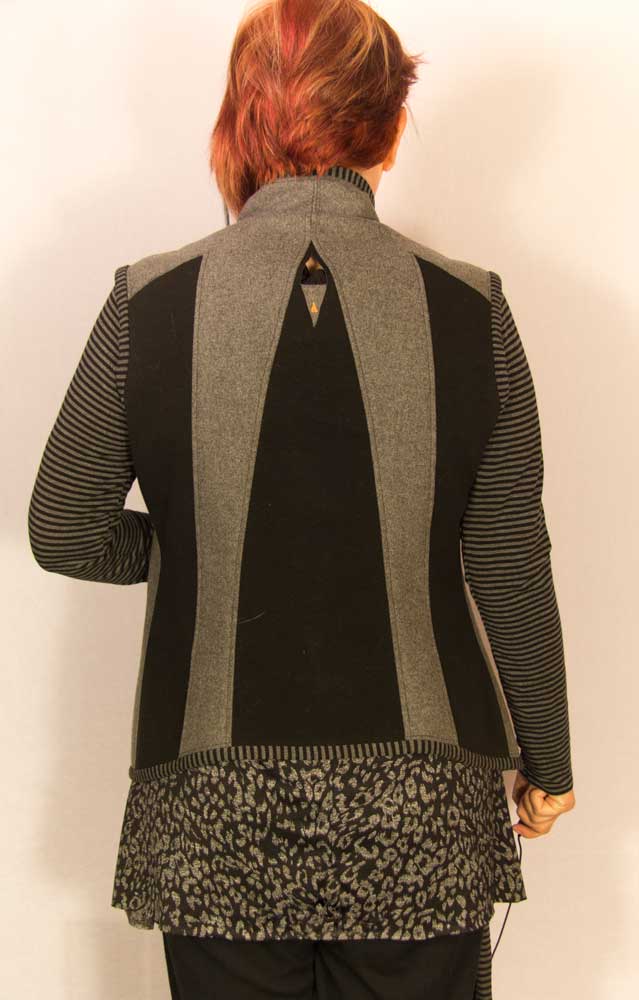
For the asymmetrical collar, I copied a few of the previously designed poppies and had them land in the corners. Now all I have to do is wait for some cooler weather!

2016-07-03-11.53.18-6

Eco-Dyeing with Ayn Hanna

Eco-Dyeing_11This last October I took an eco-dyeing class with local Fort Collins artist Ayn Hanna. It was just a whim to try something new, and this process is very different from anything I’d tried before. Ayn is very organized and had class notes and worksheets all ready for us. She also had various leaves, natural dye baths and a couple of steamers heated up. The plant knowledge needed for this type of dying is more than I can describe in this blog, but there are several good books on the subject. I highly recommend taking a class from Ayn or someone in your area.

Eco-Dyeing_8

Preferably starting with wool or silk, start by soaking your natural fabric in water. Then wring the piece out, lay it flat and place an assortment of leaves on top. Using a dowel or copper pipe roll the fabric strip tight and bind with cord before placing the bundle in a steamer or dye bath. You can see the cord binding on the bottom edge of the dyed cloth where the dye bath is also the strongest. After soaking for several hours minimum, the bundles sat in my garage for about 3 weeks until I unwrapped them to see the magic.Eco-Dyeing_10

Why are some of the leaves black and some orange? Well that is where the knowledge and experience come in. Strangely enough, eucalyptus leaves dye the fabric orange, but I didn’t get consistent results on this first try.Eco-Dyeing_4

The piece above had some raspberry juice added, and I love the colors!

Eco-Dyeing_2This one is on rayon and silk velvet. It ended up a gorgeous texture and sheen.

One of the challenges for me with this type of dying is the washability of the textile. Setting the dyes is not as sure as when using fiber reactive dyes. I made about 20 pieces of varying success that weekend and plan on experimenting with setting the dye on some of the rejects first. Will I use this dye process in the future? Well I might take the class every year! The set up was extensive with 5 dye baths and two steamers for about 8 of us to share. If I did this at home I think I would need to choose just one or two dye baths…maybe onion peel and walnut. Steaming worked well, but more pastel and I like a deeper color palette.

Eco-Dyeing_3

Eco-Dyeing_9I’m sure that you will see some of these appear on future blogs, even if I only make purses out of them they would be beautiful! Thanks Ayn!

Fabric “Store” and Photo Studio Remodel

Fabric-Storage1

While other people like to spring clean, I went to school for so many years that I’m still hooked on a late summer back to school schedule. When the notebooks and pencils start showing up in the stores I want to straighten out my drawers, closets and work areas. We rearranged some rooms in our house leaving a small windowless “bedroom” that I could use to store my fabrics, yarn and set up some lighting for photography.

Previously my fabric lived in 3 different areas and I had no idea how much I owned! This stash may be too much to some, but I just love looking at those shelves of delicious fabrics in my favorite colors. Fabric-Storage-2The top left shelf has some lovely African batiks that I inherited, along with my silk and metallic fabrics. Sewing and knitting books also have a space here, and there is room to grow! The next shelf two shelves below the books are woven textiles. The shelf to the right is all knits except for more wool on the bottom shelf, and some leather rolled up on the top.

yarn-winder

My yarn stash is not nearly as large, and many of these are leftovers from previous projects. I have a different approach to my knitting than my sewing. As I near the end of a project I usually, I go to ravelry.com and look at patterns that I have favorited (I’m sure this word will be accepted in the dictionary soon.) in the past or research something I want to make, for example a new winter hat. Then I go to my LYS and pick out the yarn.

refashion-stashThe next area in my room is for my refashion stash. These are clothes that I have picked up at resale shops, or items from my closet that I no longer wear, but love the fabric or a detail. The upper left bin is all linen items. The right side box contains cashmere sweaters from my husband, myself and resale shops. Wash and dry them in the machine and they shrink up to a yummy softness. Moth holes virtually disappear, and I can then sew them into a new garment. Lights-and-Backdrop

The photo studio is the last wall in this room. I’m at best a hobbyist at photography, but the new bright lights and pull down backgrounds should help with the post processing that I did previously to make up for low spotty lighting. I haven’t had time to test out the photo area, but I’m currently sewing two new tops that I will photograph for my next blog.

Valentine’s Vest and Tunic Top

Vest-and-Tunic-FMwebI bought this cool fabric from The RainShed back in September when I returned from my Diane Ericson retreat in Taos. A fellow sewer, Gwen was making a cool vest out of the fabric, which is grey wool laminated to a black knit. Both sides are attractive and the fabric does not ravel so Gwen was cutting holes out to add interest to her project. I had to try some of this fabric!

Finding the right pattern for me took a while, but I finally settled on Vogue 8932, since it has so many panels to show off both sides of the textile. I like to wear layers so a vest is perfect. I added 2” to the length of the pattern and eliminated any facings. Frankly, I think the final vest looks more like the photos on the pattern cover and it would have felt too short if I had not added the length. Instead of facings a knit stripe finishes off all of the edges.Vest-and-Tunic-BMweb

I added the cut outs to emphasize the lines of the front,Vest-Cut-Detail-DSweb and placed a few appliqué pieces to carry an asymmetrical line on my left.Vest-Detail-FS-copy The piece needed a little sparkle so I added a small triangle of metallic paint to each of these larger triangles. Just one triangle brought the design to the backside.Vest-Detail-BSweb

 Finishing the vest left me with the question of what to wear underneath. I had pulled out a number of coordinating knits when deciding on the edge treatment. Since several of them went well with the grey/black fabric, I decided to whip up a knit top to wear under the vest. Vogue 8952 is so easy and only took about 2-3 hours to cut out and put together.Tunic-Top-FMweb

I can’t wait to wear this on Valentine’s Day! Hmm…red pants might be a fun look.

Details of The Log Cabin Heart Felt Coat

By the way, today is National Cat Day. My cat Ichi is expecting some major attention.

Ichistamp

I had a few requests for information on the construction details of my coat. The fabric is just a single layer of wool so it’s perfect for fall in Colorado. It’s roomy so I will be able to wear a sweater underneath as it gets cooler.

Log Cabin Heart Felt Coat WF1

Below is a detail of the collar and front closure. I found a cool button at my local yarn shop, The Loopy Ewe.

Log Cabin Heart Felt Coat D1In this image you can see the decorative stitching that is holding the different colors of wool together with a butted joint. I used that wonderful presser foot with the metal blade down the middle. You can also see that not all of the wools are solid. The rusty-red has a subtle plaid.Log Cabin Heart Felt Coat D4

Log Cabin Heartfelt Coat

Log Cabin Heart Felt Coat- Front_wfLog Cabin Heart Felt Coat- Back_wf

My first blog entry!

I just finished a new fall coat using Diane Ericson’s Heartfelt Coat Pattern. I hot water machine washed the wool yardage to felt the fibers together. After that I worked with the fabric patterning in order to build yardage that would enhance with the coat pattern. The wool is butted together and held with a decorative stitch. I actually started this 5 years ago and put it in a basket because it was just too big of a project.

I wore it on Saturday night and it was a success!