Match it, Match it good!

I finally finished the plaid shirt! I’ve never spent so much time on a project with this inexpensive of a fabric, but I’m glad I did. I posted my hopes and intentions on my last blog. That sure put me on the spot, and I needed to follow through. May not do that again…

IMG_2307
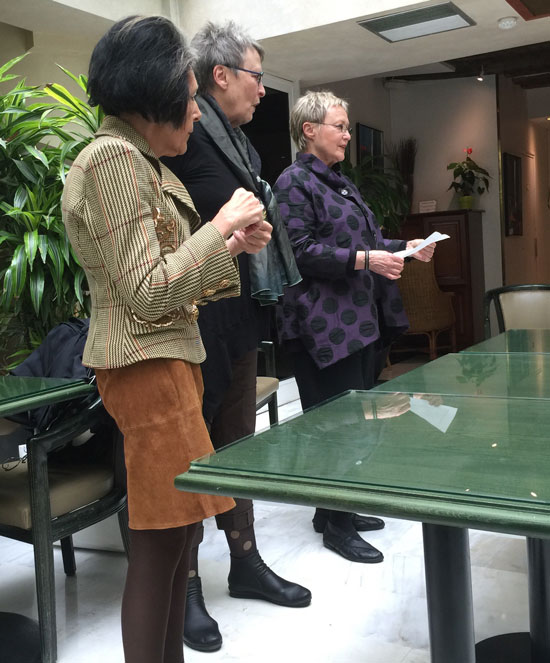
To add complication, I decided to make a pattern from my favorite shirt shown on the left. There are two of these are in my closet in different colors. I’ve only drafted a pattern a few times, and never with a complex piece of clothing (darts, pleats, placket, pockets). The drafting went well, but the first muslin was too small. I know it looks great on Roxanne, but she is the size I want to be. LOL

IMG_2305

After adjusting the pattern I jumped right in without a second muslin. Frankly, I couldn’t wait to post this, but a few fitting adjustments still need to be done on the final shirt. The changes then need to be documented on the final pattern for next time, and there will be a next time!Plaid-shirt4

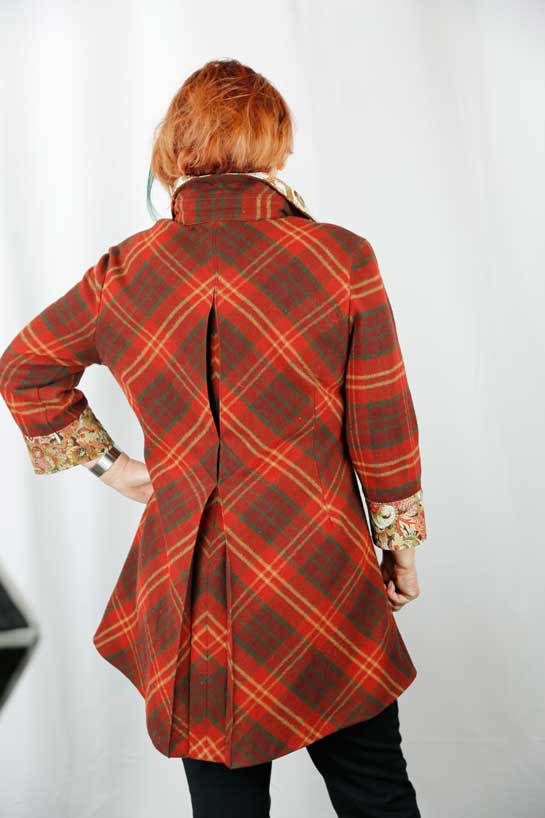
Referring back to the last post, most of my stated design goals were accomplished in the shirt. Two related coordinating fabrics are used to break up all that plaid. My new embroidery machine performed flawlessly, and I smile at the unexpected fine embroidery on the casual flannel fabric.Embroidery DetailThe final desire was an interesting back pleat, and on the diagonal. The uneven plaid was tough to match in back, but at least I avoided matching the sides.Plaid-back

However, the sides came out well despite my not even trying. Don’t you love it when things just work out like that? Is this what you expected after reading my first blog?Plaid-back-side

Adventures in Italy and France with my BSF: Part 2 Paris

The second two weeks of our trip were in Paris. Of course, this was before the terrorist attacks. Paris was colorful, lively and simply a delightful place and we are all hoping for a return to it’s former self soon.

We wandered the first day and caught up on a little sleep before taking a cooking class the second night. The food in Paris is great everywhere, from small café, to street vendor to restaurant. There was a lot of walking on our tour, which was a good balance with lots of eating and wine!

Monkfish-with-Ratatouille

Monkfish on a bed of ratatouille at our cooking class

Marcy and Katherine Tilton were knowledgable and fun guides who planned an inside tour for our group. The very first afternoon we had an introduction to their friend Dominique who brought in examples from her exquisite collection of little black dresses.

Dominique-Marcy-and-Katherine

Dominique, Katherine and Marcy at our introduction meeting.

There is no way to cover all of our experiences in a post, but a few of the highlights were the couture flower maker…

Couture-flower-maker2

Each Petal is hand dyed then hand formed with heat and wax with special tools.


the Korea Now! exhibit at the Musée Les Arts Decoratifs-Mode et Textile…

Korea-show

Contemporary gown with a traditional Korean influence


the Alber Elbaz-Lanvin exhibit…

Lanvin-exhibit

Sweater knit by me, upstaged by some fabulous draping on the mannequins

Giverny in the fall…

Giverny-in-the-Fall

Monet’s pond at Giverny

and then Monet’s water lily rooms at the Musée de l’Orangerie…

Debra-and-I-at-l'orangerie

We’re wearing the clothes we made!

and of course SHOPPING! both window and…

real!

This is just some of the purchases. My cat doesn’t want me to sew the scrumptious silk velvet.

The best thing? Being greeted with a beautiful bouquet of roses and a hug when I walked into my door!Welcom-Back-Roses

Eco-Dyeing with Ayn Hanna

Eco-Dyeing_11This last October I took an eco-dyeing class with local Fort Collins artist Ayn Hanna. It was just a whim to try something new, and this process is very different from anything I’d tried before. Ayn is very organized and had class notes and worksheets all ready for us. She also had various leaves, natural dye baths and a couple of steamers heated up. The plant knowledge needed for this type of dying is more than I can describe in this blog, but there are several good books on the subject. I highly recommend taking a class from Ayn or someone in your area.

Eco-Dyeing_8

Preferably starting with wool or silk, start by soaking your natural fabric in water. Then wring the piece out, lay it flat and place an assortment of leaves on top. Using a dowel or copper pipe roll the fabric strip tight and bind with cord before placing the bundle in a steamer or dye bath. You can see the cord binding on the bottom edge of the dyed cloth where the dye bath is also the strongest. After soaking for several hours minimum, the bundles sat in my garage for about 3 weeks until I unwrapped them to see the magic.Eco-Dyeing_10

Why are some of the leaves black and some orange? Well that is where the knowledge and experience come in. Strangely enough, eucalyptus leaves dye the fabric orange, but I didn’t get consistent results on this first try.Eco-Dyeing_4

The piece above had some raspberry juice added, and I love the colors!

Eco-Dyeing_2This one is on rayon and silk velvet. It ended up a gorgeous texture and sheen.

One of the challenges for me with this type of dying is the washability of the textile. Setting the dyes is not as sure as when using fiber reactive dyes. I made about 20 pieces of varying success that weekend and plan on experimenting with setting the dye on some of the rejects first. Will I use this dye process in the future? Well I might take the class every year! The set up was extensive with 5 dye baths and two steamers for about 8 of us to share. If I did this at home I think I would need to choose just one or two dye baths…maybe onion peel and walnut. Steaming worked well, but more pastel and I like a deeper color palette.

Eco-Dyeing_3

Eco-Dyeing_9I’m sure that you will see some of these appear on future blogs, even if I only make purses out of them they would be beautiful! Thanks Ayn!

Fabric “Store” and Photo Studio Remodel

Fabric-Storage1

While other people like to spring clean, I went to school for so many years that I’m still hooked on a late summer back to school schedule. When the notebooks and pencils start showing up in the stores I want to straighten out my drawers, closets and work areas. We rearranged some rooms in our house leaving a small windowless “bedroom” that I could use to store my fabrics, yarn and set up some lighting for photography.

Previously my fabric lived in 3 different areas and I had no idea how much I owned! This stash may be too much to some, but I just love looking at those shelves of delicious fabrics in my favorite colors. Fabric-Storage-2The top left shelf has some lovely African batiks that I inherited, along with my silk and metallic fabrics. Sewing and knitting books also have a space here, and there is room to grow! The next shelf two shelves below the books are woven textiles. The shelf to the right is all knits except for more wool on the bottom shelf, and some leather rolled up on the top.

yarn-winder

My yarn stash is not nearly as large, and many of these are leftovers from previous projects. I have a different approach to my knitting than my sewing. As I near the end of a project I usually, I go to ravelry.com and look at patterns that I have favorited (I’m sure this word will be accepted in the dictionary soon.) in the past or research something I want to make, for example a new winter hat. Then I go to my LYS and pick out the yarn.

refashion-stashThe next area in my room is for my refashion stash. These are clothes that I have picked up at resale shops, or items from my closet that I no longer wear, but love the fabric or a detail. The upper left bin is all linen items. The right side box contains cashmere sweaters from my husband, myself and resale shops. Wash and dry them in the machine and they shrink up to a yummy softness. Moth holes virtually disappear, and I can then sew them into a new garment. Lights-and-Backdrop

The photo studio is the last wall in this room. I’m at best a hobbyist at photography, but the new bright lights and pull down backgrounds should help with the post processing that I did previously to make up for low spotty lighting. I haven’t had time to test out the photo area, but I’m currently sewing two new tops that I will photograph for my next blog.

I’m back!

Multiple trips and then family visiting has kept me away from my blog, but I’m back with new ideas and a few new skills and techniques to incorporate that I can’t wait to share.

But first I have to finish my show and tell of my trip to Ashland for the DOL retreat. The town on Ashland is a fantastic arts town with beautiful scenery, but the shopping is what caught my eye! The downtown has textile shops of yarn and fabric and a bead shop.Fabric-Purchase1web

As you can see I went a little crazy with the fabric, but they were so beautiful, and I don’t buy woven textiles often so this is a new start for me. Notice the little cat on the umbrella fabric…cute without being too cute. Several of these fabrics look different but great on both sides allowing for some interesting details.Fabric-Purchase-2web

Then there are fabulous clothing stores in all price ranges including a wonderful resale shop, and SHOES!!! My shoe enabler husband (is he a catch or what?) took me shoe shopping and I ended up with 4 pairs of new shoes. Ashland-Shoes-BrightwebImelda eat your heart out. Aren’t these cool and unusual?Ashland-Shoes1web

I have cleaned up my studio after returning from a small steel smithing class and promise that next week I will start to show more hand-made projects, including what I learned about working with steel. So exciting!

Special Occasion Tee Shirt

I’m still catching up after the holidays (aren’t we all?). In November my BSF (Best Sewing Friend) Debra and I got together to dye fabric. A stretch rayon and silk velvet from Dharma Trading was our main focus for the dying session. Shown below is the effect we obtained using low immersion method of dying with fiber reactive dyes. Imagine this velvet started out white!

Holiday-Tie-Dye-FabricWe both wanted a comfy, but dressy tee to wear to holiday events. Pattern Vogue 8962 was the perfect answer for me. Debra used Vogue 8952 and her top was equally beautiful. I’m hoping to do a photo shoot of her clothes soon, since sew together so often.Holiday-Top-Front2-copyThe only change was a small ruffle added to the bottom adding a little flare and a bit more length.The tee is stretchy and comfortable, but still a little dressy. I wore it on multiple special occasions, and will still be able to wear it any time this winter.Holiday-Top-Back_2 The contrasting yoke was intentional, but yes, I did have a cutting snafu and had to piece the darker velvet!

Log Cabin Heartfelt Coat

Log Cabin Heart Felt Coat- Front_wfLog Cabin Heart Felt Coat- Back_wf

My first blog entry!

I just finished a new fall coat using Diane Ericson’s Heartfelt Coat Pattern. I hot water machine washed the wool yardage to felt the fibers together. After that I worked with the fabric patterning in order to build yardage that would enhance with the coat pattern. The wool is butted together and held with a decorative stitch. I actually started this 5 years ago and put it in a basket because it was just too big of a project.

I wore it on Saturday night and it was a success!