Vote for my Cat!

Zatoichi-FranzenI entered my cat Zatoichi (Ichi for short) for a spot in the calendar of Fort Collins Cat Rescue our wonderful local cat shelter where she came from. She’s now one of the 30 finalists and would dearly love to be a Miss September (or January…) and help the shelter. Please go to www.fccrsnc.org and vote for my cat before September 12th!

MTilton-9193_4

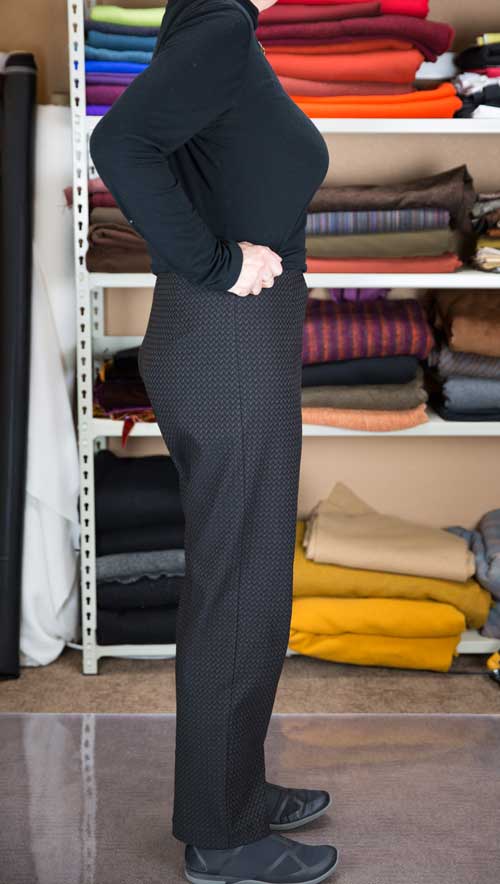
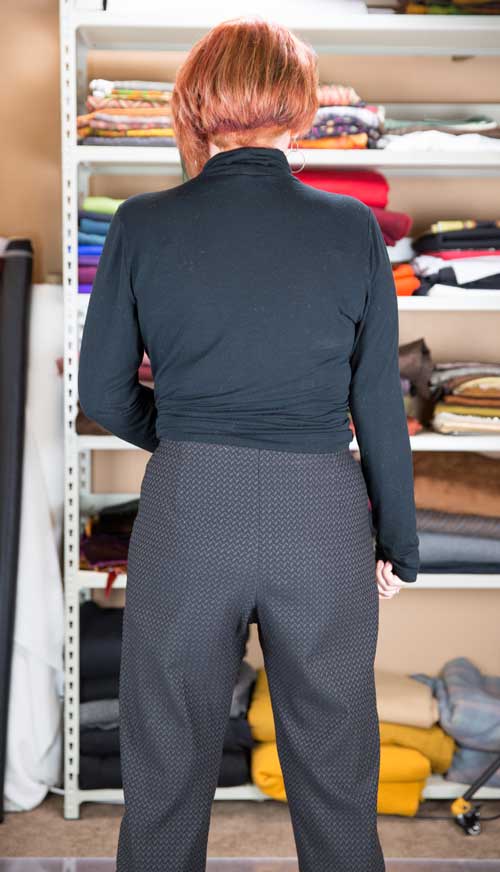
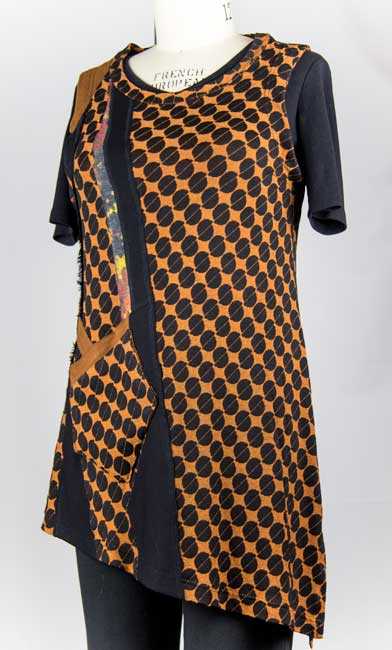
Back to sewing. Here is my version of the new Marcy Tilton top from Vogue 9193. My every day dressing consists of a pair of knit pants and a top. If I go out of the house I like to add a cool jacket/coat or poncho. Most pants are fairly neutral so that leaves the tops to carry the interesting details. This pattern has lots of promise for both dressy, and an everyday wear piece that has some style. The addition of a pocket makes it function even better than most patterns.

MTilton-9193_5

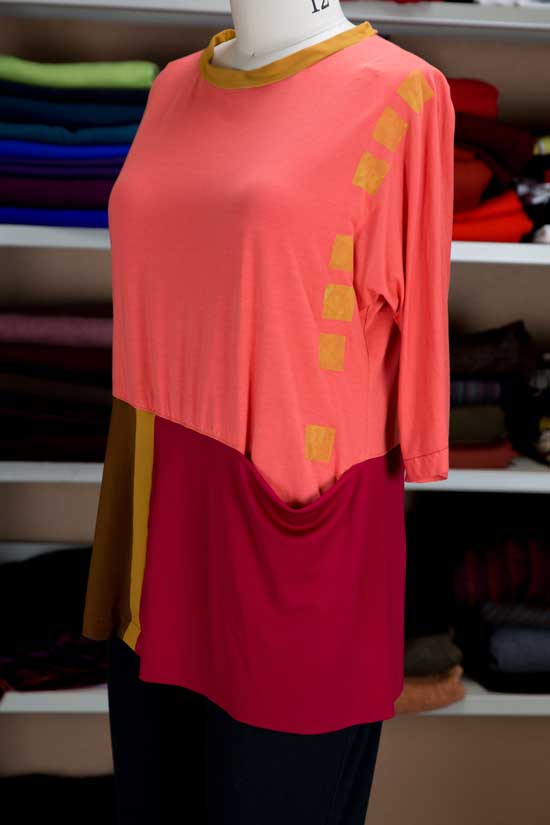
The sample photos are sewn with a single fabric, but the line drawings inspired me to try multiple fabrics. After cutting it out in three colors it just didn’t look balanced. The additional gold bands and neck seemed to pull the whole piece together. After sewing it all up I decided to add the stencil pattern to the front.

MTilton-9193

I’m already wearing this a lot, but I do think I will make another design change in the future. The top has a subtle angled bottom band, and sometimes it simply feels odd. The change could be to make the angle steeper and more obvious. However, if I continue with the Mondrian styled piecing it’s possible the top would look better being simpler and straight. Or should I leave it alone?

MTilton-9193_2

It’s a great top and I’ll try the pants some time and let you know how they fit. I’m at Diane Ericson’s Design Outside the Lines in Taos this week having a wonderful sewing adventure with my BSF. Don’t forget to vote for my cat Zatoichi!

Caftan to Beat the Heat

A number of months ago I promised to spend more time on explaining process of making a new piece. Well, admittedly I had a lot going on, but it took months to finish this caftan! The linen Moulin Rouge fabric from Marcy Tilton was the initial inspiration and it just got crazy from there. How difficult can it be to make a caftan? Who needs a pattern? Or so I thought when beginning this piece that turned out quite complex.
Moulin-Rouge-Caftan_3
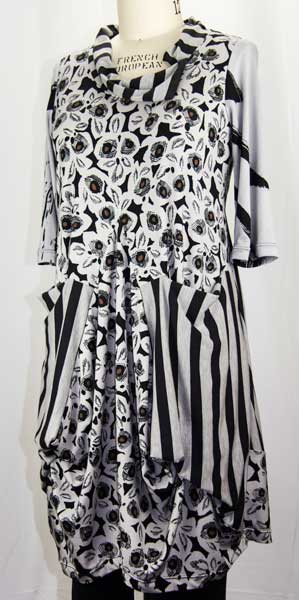
The other linen pieces come from my stash and were made into a rectangle of pieced fabric that I then draped on Roxanne. Cool, this is going to be easy! caftan-draping
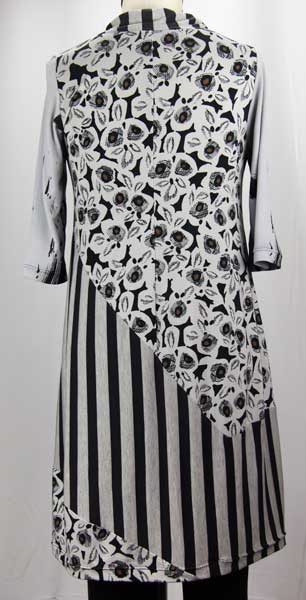
The back panel also needed to have a mix of fabrics so I decided to make a diagonal slice on the patchwork piece to make a wedge for the back. This seemed like a great idea and here is the back panel on the floor. However, all the angles started getting confusing on such a large project. caftan-fabric-pieceA shirt would have been much easier to manipulate, but I persevered adding more black linen until I had back and front rectangles to form the caftan. After sewing the shoulders it was time to look at the neck. It’s difficult to see, but I’m intrigued with this idea of a turned rectangle to form an asymmetrical neck. The shoulder seam is the black to black seam starting on the lower left hand side of the photo. The other shoulder continues diagonally across the rectangle to the upper the right hand side of the photo. Unfortunately, in the end the neck was too big, and I’m not a big fan of my bra straps showing. I played around with the neck later and came up with a solution, but I would love to perfect this idea in another project.

caftan-neck-detailSo at this point the project looks cool on Roxanne so I try it on. It looks terrible on me!!! Too much fabric…we’re talking full size tent, and it’s heavy! Time to start chopping! Moulin-Rouge-CaftanI decide that instead of a classic rectangular caftan that I will just cut into the sides forming sleeves as you can see in this photo of the back.caftan-pocket-detailThis reduced the bulk by about half so I decided to focus on a pocket. I’m very fond of how the pocket came out. However at that point the caftan still fit poorly. The photo below is after all the tweaking, and you can see I lost a little of the pocket opening when I took more out of the sides.Moulin-Rouge-Caftan_1

Finally, I start gathering up the front to give the garment some definition at my waist. It’s starting to look much better, so I take it over to my BSF to help me perfect the final folds while wearing the piece. I found a nice little fabric bit in my stash painted by Miles Frode and used it to integrate the intersections of the folds. Moulin-Rouge-Caftan_2
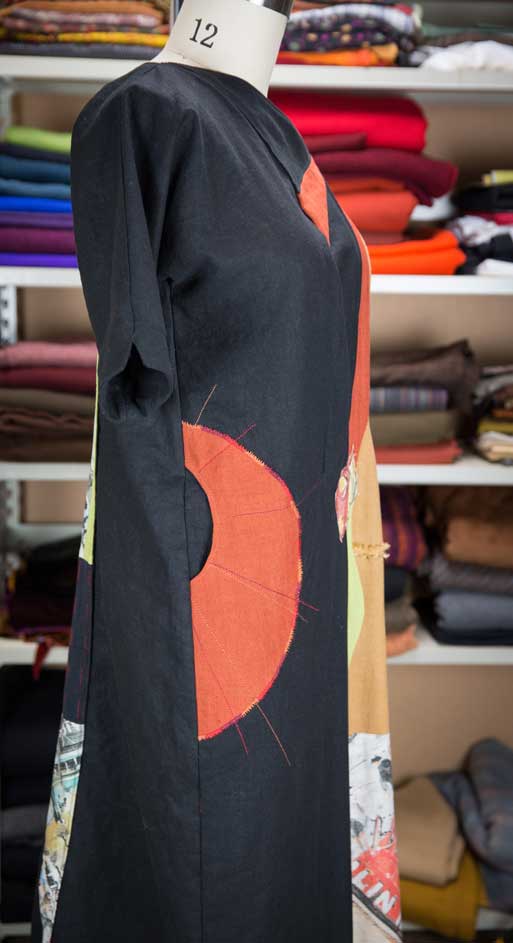
You can also see how I resolved the neck. Hopefully it looks intentional…The outfit is fun, I will wear it and most of all I enjoyed the process and learned a lot!

I hope to finish my summer coat this week now that the temperatures are in the 80’s to 90’s and I don’t need it! Early fall will also be perfect for a light wool coat, so no harm done. I’m starting to catch up with my UFO projects and hope to start something completely new next week.


Pants that Fit!

I decided that a classic straight-leg pant would flatter me more than a skinny pant, but where to find a selection eluded me. Yes, I could find black, but for a straight-leg it seemed there should be other choices. Oh yeah, I sew! This led me to buy the Craftsy class The Pants Sloper by Suzy Furrer. This may not be my most exciting post, but what a challenge! The sewers will understand, and my next post is lots more fun….

To my non-sewing friends, a sloper is the most basic fit pattern that you use to develop other patterns. The sloper can then be made into wide-leg pants, tailored pants with a waistband, or any other shape one wants. I’m looking forward to making some wide leg linen pants for summer.

Pants-sloper_1

Furrer is very clear and easy to follow, but my first muslin was too small. Hint, listen to the teacher and don’t take your own measurements! I also missed one step in the drafting…sigh. The second sloper was close, but needed some adjustments. The third try was made with a yucky fashion fabric that I’d saved from the trash just for this purpose. Eureka!

Pants-sloper

So after days of measuring and sewing I have a pair of pants that fit fairly well. I think this pair is just a touch large, but probably just needs a little adjustment since the fabric is stretch. In addition, I’ll be lowering the hem by the time this post is published, but I’m very pleased overall.

Pants-sloper_3

The fabric is a fantastic stretch woven from MarcyTilton.com (no longer available). Since the fabric is stretch I was able to make the sloper without any alterations to the waist. I even kept the darts so I wouldn’t have any gathers at the waist. I just added a nice wide piece of elastic and interfacing at the waist for a smooth front.

The class was excellent and I can highly recommend going through the process. I plan on taking her other sloper classes soon, and even purchased her book, Building Patterns, The Architecture of Women’s Clothing. Obviously I like a good challenge!

Adventures in Italy and France with my BSF: Part 2 Paris

The second two weeks of our trip were in Paris. Of course, this was before the terrorist attacks. Paris was colorful, lively and simply a delightful place and we are all hoping for a return to it’s former self soon.

We wandered the first day and caught up on a little sleep before taking a cooking class the second night. The food in Paris is great everywhere, from small café, to street vendor to restaurant. There was a lot of walking on our tour, which was a good balance with lots of eating and wine!

Monkfish-with-Ratatouille

Monkfish on a bed of ratatouille at our cooking class

Marcy and Katherine Tilton were knowledgable and fun guides who planned an inside tour for our group. The very first afternoon we had an introduction to their friend Dominique who brought in examples from her exquisite collection of little black dresses.

Dominique-Marcy-and-Katherine

Dominique, Katherine and Marcy at our introduction meeting.

There is no way to cover all of our experiences in a post, but a few of the highlights were the couture flower maker…

Couture-flower-maker2

Each Petal is hand dyed then hand formed with heat and wax with special tools.


the Korea Now! exhibit at the Musée Les Arts Decoratifs-Mode et Textile…

Korea-show

Contemporary gown with a traditional Korean influence


the Alber Elbaz-Lanvin exhibit…

Lanvin-exhibit

Sweater knit by me, upstaged by some fabulous draping on the mannequins

Giverny in the fall…

Giverny-in-the-Fall

Monet’s pond at Giverny

and then Monet’s water lily rooms at the Musée de l’Orangerie…

Debra-and-I-at-l'orangerie

We’re wearing the clothes we made!

and of course SHOPPING! both window and…

real!

This is just some of the purchases. My cat doesn’t want me to sew the scrumptious silk velvet.

The best thing? Being greeted with a beautiful bouquet of roses and a hug when I walked into my door!Welcom-Back-Roses

Vroom! Vroom!

I’m not only back, but have just finished a project that I have been working on all summer! With a season filled with friends and trips, I can’t complain about how long this moto jacket took, but it sure seemed like a lot of hours were spent on it. Moto-Jacket

When planning my fall travel wardrobe, the Islander Sewing Systems MotorCity Express jacket seemed perfect for Travel. It came to my attention on a class at Craftsy featuring (and including) the pattern. The hybrid plastic-coated, quilted knit came from Marcy Tilton.com a while back and is perfect for making a raincoat or jacket. Street photographers give the impression that Paris is teeming with moto jackets. It’s also wet there so a lightweight rain jacket will come in handy and be stylish. I own a leather version and it weighs too much to bring on a trip.

So that’s the history, but making the jacket took me forever! First I cut everything out and this pattern has a lot of pieces! There are 26 separate pattern pieces, in 5 different materials including the main and contrast fabrics plus lining, interlining and facing/pocket fabrics. I had piles of fabric everywhere! In addition you had to custom size the zippers, which was no small feat.

I need to add a comment about the Craftsy class. After finishing the zipper section I noticed a comment on the right of the video that said, “WAIT!” There were mistakes in the video! Seriously Craftsy? I’m supposed to notice that note before watching the video? Janet Pray’s note went on “If you have already cut your zipper, go back and re-measure and re-cut.” I ordered these zippers on-line! Luckily, mine were correct since I was also following the included written instructions, but this could have been a nightmare! Craftsy when you find a mistake like this you should re-film the class, or at the very least put the warning in the video.The class was helpful, but I don’t like the class’s order of construction, which is supposedly designed to save time. There are too many steps when you move from piece to piece instead of finishing what you have in your hand. For example I would have prefer to make my entire lining including sleeves, and then my entire fashion fabric including sleeves. Janet Pray’s method had you wait until the end to sew the last sleeve seam (there were 2) and set-on all four sleeves at once. This just left me with nothing completed until close to the end. I like to finish a full portion of the project and put it aside to work on the next portion. I suppose her method would be fine if I had constructed this jacket in days instead of weeks. Every time I picked it up again I needed to figure out where I was in the process.moto-jacket_2

With all that criticism I must say I love this jacket! It fits well and the zippers look great. I did not put the chest pockets on since I don’t need to draw attention to that area of my body with shiny zippers! However, that is the only modification I made which is pretty amazing. I plan on this jacket being able to handle a sweater underneath so the size (medium) is the perfect roomy but still figure flattering silhouette.Moto-Jacket_1

Lime Tunic – Marcy Tilton Vogue 9112

This dress (in this case, tunic) by Marcy Tilton is brilliant! First of all it looks great on and second, and equally important, it feels great on.  I’ve also worn it with a Sleevy Wonder when it was a little cooler out. A T-shirt could also be used to easily add sleeves, especially if it’s made from a slippery knit. Even though this pattern takes time with all the different pattern pieces to cut and sew, I’m already thinking of making a second version. Maybe I’ll try adding a sleeve next time, or I’ll make one of Marcy’s little cardigans that have been on my sewing project list for a while. It’s so cold in air conditioning and so hot outside this time of year!

Lime-V9112_1

Mixing the pattern pieces of both linen and knit gives the tunic the comfort and ease that I desire in my casual clothes. Both of these matching fabrics right in my stash waiting to notice that they match! There really is nothing as joyful as a well stocked stash, and mine is looking good these days.

Lime-V9112_3

The tunic is 4″ shorter than the dress pattern in order to look proportionate with leggings. Since the bottom band would almost disappear with the shorter length I altered it to attach higher up on the back. I hand top stitched the pieces where the seams press toward the linen, and stopped when the seams pressed toward the knit, hoping to achieve an interesting balance of lines.

Lime-V9112_2

The only other minor alteration is a doubled collar which allows for the neck to sit up a little stiffer. While this linen is the same on both sides, the double collar also fixes the problem of a fabric with an unattractive wrong side.

Pockets, interesting details…what’s not to love?

Statuesque Dress

Statuesque-Dress-Front1

I’m back! I’ve been sewing whenever I can, but I’ve had no time to blog. Love, love, love this dress. I found the fabric on Marcy Tilton’s site and ordered two repeats immediately! Good thing since it was gone the next time I looked.

It’s a digital print on the softest piece of medium-light weight french terry. Seriously, french terry…I could wear this dress to the beach and then a dinner party and not skip a beat. Yes it shows my dreaded arms, but my BSF has convinced me that it gets too hot to always cover up. I might make a little cover up jacket for cool evenings with Marcy’s Vogue 9081 pattern, but I hate to cover up the statue that is peeking out on my left shoulder. Statuesque-Dress-Frontclose

The pattern is self drafted from a knit dress I own, and then I modified it to have cap sleeves to protect my pale shoulders. The other modification is the asymmetrical neckline that helps emphasize Venus on my shoulder.

Statuesque-Dress-Back1

Venus ended up on my left shoulder on the back too!

Tunic Topper #1 (because I want more of these!)

Tunic-Topper_2webI promised no more vests for a while. When my BSF called this a vest I almost felt instant regret, but this is NOT a vest! I’m calling it a tunic topper. I made view C of Marcy Tilton’s new Vogue pattern 9057. I have lots of plain tops that need a little pizzazz! While it would be fairly easy to make a sleeveless top from a TNT pattern (tried and true to my non-sewing friends), this pattern was on sale and too perfect to resist.Tunic-Topper_1web

First I took some favorite fabrics and made a collage strip. I played with my new Baby Lock cover stitch machine for some of the decorative seams. I also recently bought a used Pfaff as a second sewing machine that has the IDT built-in walking foot feature. I may review these on a later post, but they were great for making this topper. After I made the strip I placed it on the front pattern piece and sewed it on. From there I just followed directions until the end when I decided I needed a pocket.Tunic-Topper_3web This top already had plenty going on! Placing the pocket on the decorative strip didn’t interfere with the overall design and I now have a very functional top. I’m going to need several of these for winter wear around the house and beyond. I can put it on over any of my plain tops so it’s an easy, fun and artsy top that is a must for my wardrobe!

Debra and Marcy I Apologize…

Black-Grey-Marcy-Dress My BSF made this dress by Marcy Tilton (Vogue 8975) and tried to convince me to sew one with her. “It will look like a big gunny sack on me” I scoffed. Well I tried on Debra’s dress when she finished and loved it! It’s comfy, clever, perfect for the change of seasons, and no, it does not look like a gunny sack. I should have modeled it, since it actually looks better on me than on Roxy.Black-Grey-Marcy-Dress_3

One does need to read the directions for this dress. The garment goes together fairly quickly despite many pieces and a few odd instructions, for example attaching a point on the hem to the bottom of the pocket.

Black-Grey-Marcy-Dress_2 I made three minor modifications to the pattern. The collar is my invention and I am very happy with it. You may see it again in the very near future. I used three fabrics instead of two, and I shortened the dress two inches so it doesn’t overwhelm me. There’s a lot of fabric in this dress, but it is light and soft so it all works. The back is pretty jazzy too!Black-Grey-Marcy-Dress_1